How to vibe code: A practical beginner guide to AI development
How to vibe code: A practical beginner workflow that keeps you in control
If you are learning how to vibe code, the biggest challenge isn't just getting AI to generate code. The harder part is getting code that stays usable, testable, and consistent after the first prompt. This gap frustrates beginners, founders, and makers. This guide covers the definition of vibe coding, effective use cases, safe workflows, prompt engineering, common pitfalls, and quality checks.
What vibe coding actually means
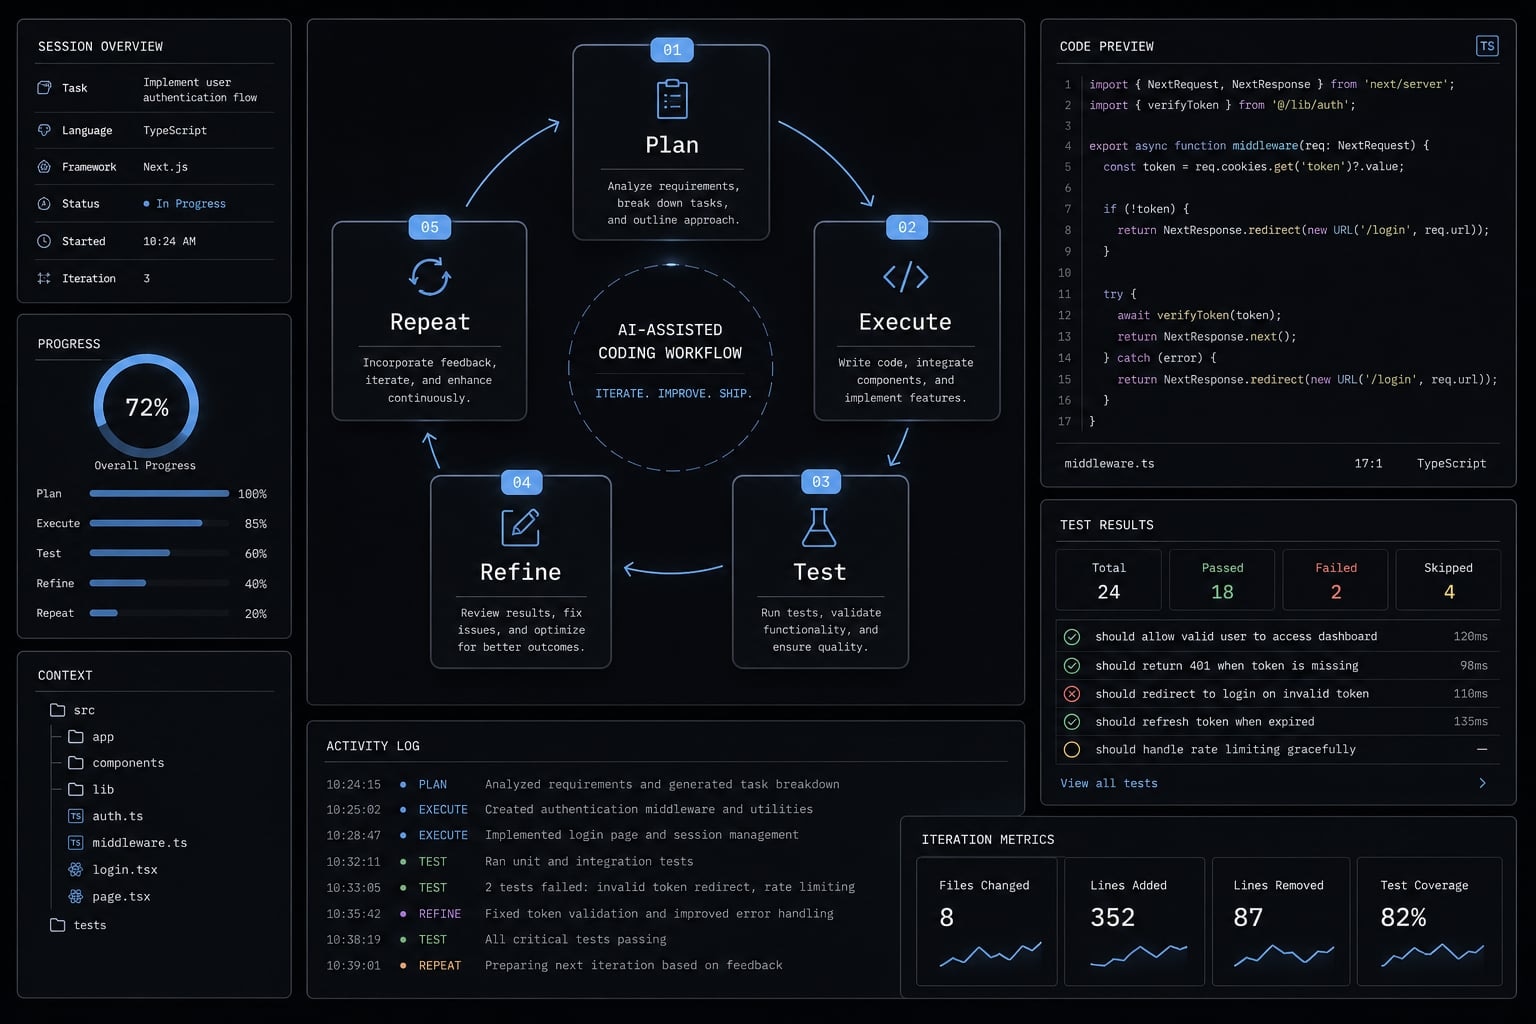
Vibe coding is an AI-assisted development approach where you describe what you want in natural language, let an AI model propose or generate code, and then improve the result through review, testing, and iteration.
In plain terms, vibe coding shifts the work from writing every line manually to directing the build through prompts, feedback, and small corrections. It is a form of natural language programming and conversational coding, but it still depends on human decisions.
That distinction matters. Many people learn how to vibe code by asking for a whole app in one shot. They get fast output, but not always a reliable product. In practice, the human still owns scope, quality, fixes, and final decisions.
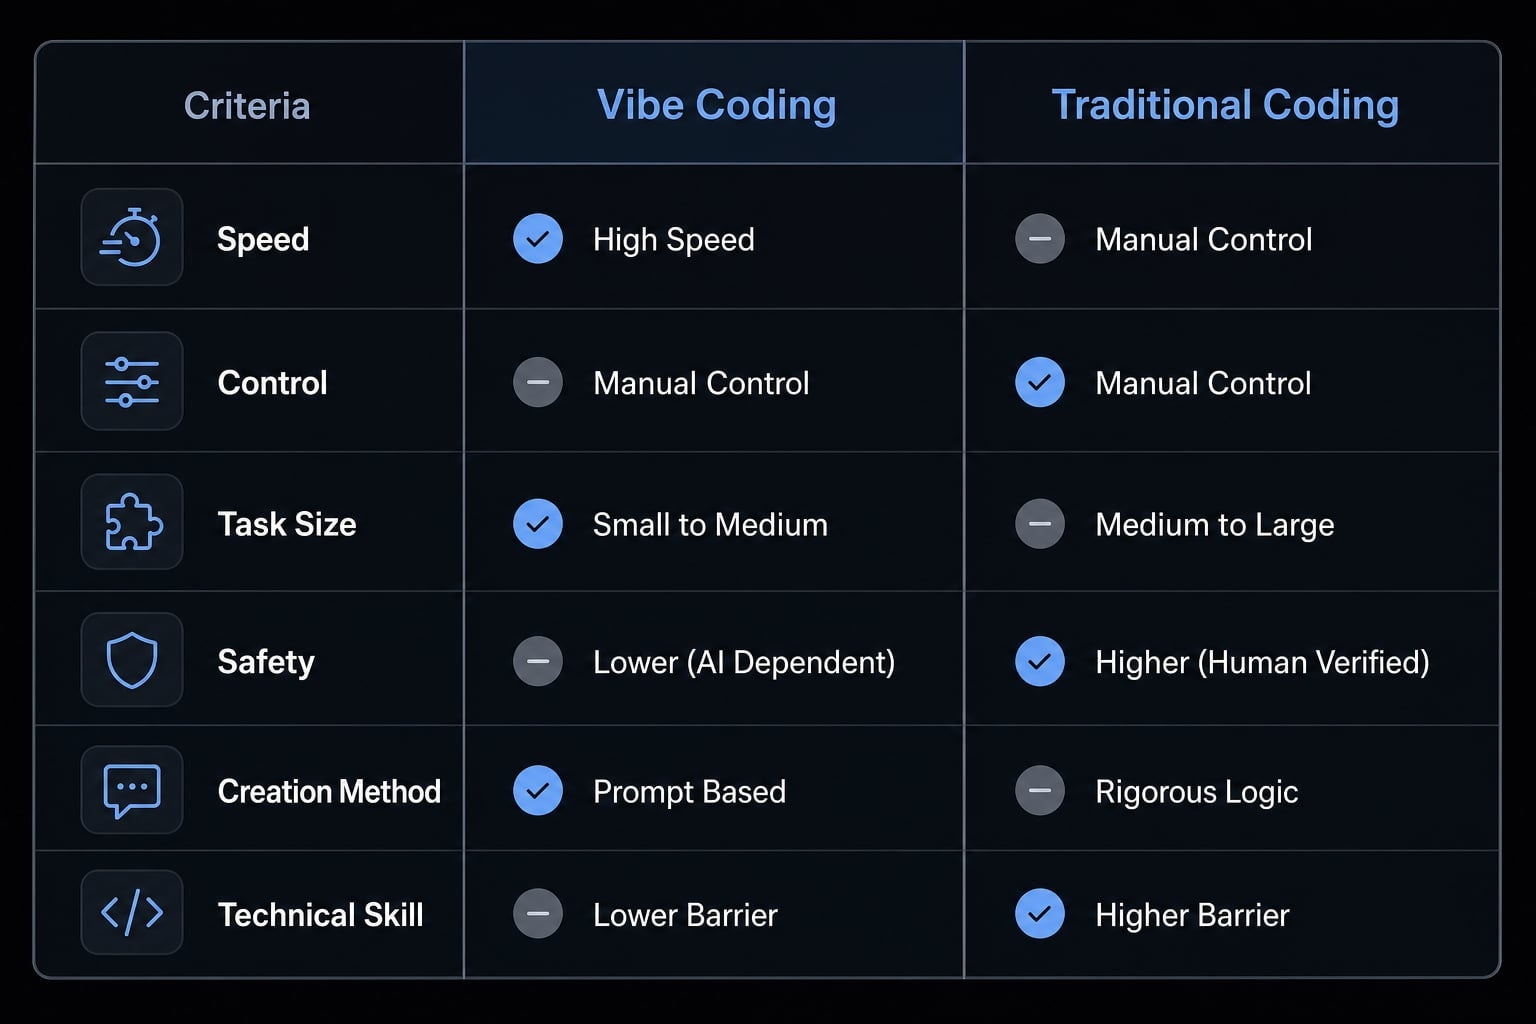
Traditional coding is usually syntax-first. Vibe coding is more intent-first. You describe the result, the constraints, and the next step, then guide the model toward something workable. That can speed up AI-assisted development, especially for small projects, but speed is not the same as control.
A common mistake is assuming “the AI wrote code” means “the product works.” It does not. AI can produce convincing output that breaks under simple use, duplicates logic, or handles edge cases poorly. That is why vibe coding works best when the project is small enough to review and test without guessing.
Vibe coding vs traditional coding
Approach | Traditional coding | Vibe coding |
|---|---|---|
Starting point | Syntax and implementation | Intent and outcome |
Typical flow | Write first, refine later | Plan first, then generate |
Main skill | Manual code-writing depth | Scope, review, and iteration |
Error handling | Manual debugging from scratch | Guided fixes through prompts and testing |
Responsible vibe coding vs blind AI output
Useful AI output is not self-validating. Responsible vibe coding uses a human-in-the-loop process. That means you still review behavior, run tests, simplify what looks messy, and do basic debugging before accepting changes. Simpler builds are safer because you can actually see whether the app behaves the way you intended.
When vibe coding works best
Vibe coding works best when the project is small, visible, low risk, and easy to test. If you can describe the workflow clearly and verify it in a few minutes, the odds of success improve fast.
That is why vibe coding is a strong fit for rapid prototyping, especially for founders and operators who want to validate a process before investing in full engineering work. A good AI coding workflow for non-technical founders usually starts with a narrow use case, not a platform.
Good fits include early mockups, internal utilities, simple frontends, small automations, and basic CRUD-style tools. A software prototype with AI becomes easier to manage when there are fewer dependencies, fewer hidden rules, and less backend complexity. This is where tech stack simplification matters. The simpler the setup, the easier the review.
Good first projects for beginners
Rule of thumb: One user, one workflow, one success metric.
- A personal dashboard that displays a few metrics or links.
- A simple lead tracker with create, edit, and delete actions.
- A landing page with a form that stores submissions.
- A lightweight internal workflow tool for one repeated task.
- A simple content or task tracker for one person or one small team.
Where vibe coding breaks down
- Security-sensitive systems raise the cost of mistakes too much for beginners.
- Compliance-heavy software needs more review discipline than most first projects can support.
- Complex multi-service products create too many moving parts to control through prompts alone.
- Hidden business logic makes output unstable, even when the interface looks correct.
- As project complexity increases, manual review and debugging become significantly more difficult.
If you are new, do not start with payments, healthcare workflows, access control, sensitive customer data, or advanced backend architecture. Trust matters more than ambition here.
A simple step-by-step workflow for vibe coding
The best beginner workflow is not “ask AI to build everything.” It is a controlled loop of scoping, planning, building in small pieces, testing, explaining, and cleanup.
- Pick a small project.
- Choose a simple setup.
- Ask for a plan first.
- Build one piece at a time.
- Test after every change.
- Ask AI to explain the changes.
- Clean up and document the working version.
This step-by-step guide to vibe coding software works because it reduces chaos. Beginners usually get stuck when they skip planning, overbuild early, or let one long chat handle too many tasks. Good results come from small loops of iterative refinement, not from giant prompts.
A practical example: Build a simple lead tracker with fields for name, company, and status. “Done” means you can create a lead, edit it, delete it, and reload the page without losing the intended data behavior.
Step 1: Pick a small, clear project
Choose one use case, one user type, and one core workflow.
- Bad starting goal: “Build a full SaaS app for sales, support, and analytics.”
- Better starting goal: “Build a simple lead tracker for one founder to add, edit, and delete leads.”
Define success in plain English. For example:
- A user can add a lead.
- A user can change its status.
- A user can remove a lead.
- The interface is easy to understand.
While this may seem basic, it prevents project bloat from the very beginning.
Step 2: Choose one tool and keep the stack simple
One environment is enough to begin. You do not need multiple editors, multiple models, a complex backend, and a deployment pipeline on day one.
Start with a simple setup that is easy to test and revise. Frontend-first or local-first is fine. Avoid adding authentication, databases, deployment, and automation all at once unless the project truly needs them.
This is basic tech stack simplification. The fewer moving parts you have, the easier it is to see what broke and why. Good AI coding tools help you edit, retry, and compare changes quickly. They do not remove the need for judgment.
Step 3: Ask the AI to create a plan before writing code
Before requesting code, ask for a plan. A useful planning request should ask the model to provide:
- A requirements summary.
- A file structure or file map.
- Implementation order.
- The simplest approach.
- Trade-offs or risks.
Then give one explicit instruction: Do not write code yet.
This is where a good planning prompt or context-rich prompt matters. Prompting for code first often creates output that looks fast but introduces unnecessary complexity. Prompting for the simplest path first gives you a chance to correct direction early.
Step 4: Build one small piece at a time
After the plan is approved, build the smallest testable slice. For a simple app, that sequence might be:
- Layout
- Input form
- Validation
- Save action
- Polish
This keeps changes visible. It also makes iterative refinement practical because you can verify one small behavior before moving forward.
Do not ask the model to change multiple systems at once unless you are comfortable tracing side effects. If the conversation gets messy, reset the thread and restate the current scope. That is beginner-friendly context window management. Long chats often become less reliable because the model starts mixing old instructions, half-finished assumptions, and new requests.
Step 5: Test after every change
After each meaningful update, click through the full flow. Do not stack new features on top of broken behavior. Fix small issues immediately, before they spread into other files or create confusing errors later. This testing habit matters more than advanced prompting.
Use GitHub or local checkpoints so you can roll back safely if a change makes things worse. Mini checklist:
- Does it still run?
- Does the expected action work?
- Did anything unrelated break?
That simple testing loop improves debugging and keeps validation grounded in behavior, not optimism.
Step 6: Ask AI to explain what it changed
Once something works, ask the model to explain it in plain English.
Ask for:
- Which files changed.
- What each change does.
- Any dependency changes.
- The logic summary.
- Why this approach was used.
This reduces blind trust and makes AI-assisted development more manageable. If you cannot explain the code or the flow at a basic level, you should not ship it yet.
Step 7: Refine, clean up, and document the working version
Working is not the same as maintainable. Before you stop, remove duplicated logic, simplify anything unnecessary, and capture what works in a short README or set of notes. This final pass improves iterative refinement, documentation, and long-term maintainability. A short note should include:
- What the app does.
- How to run it.
- What the core workflow is.
- What still needs improvement.
That small habit saves time later, especially when you return after a few days and no longer remember why the app behaves the way it does.
How to prompt AI coding tools so they actually help
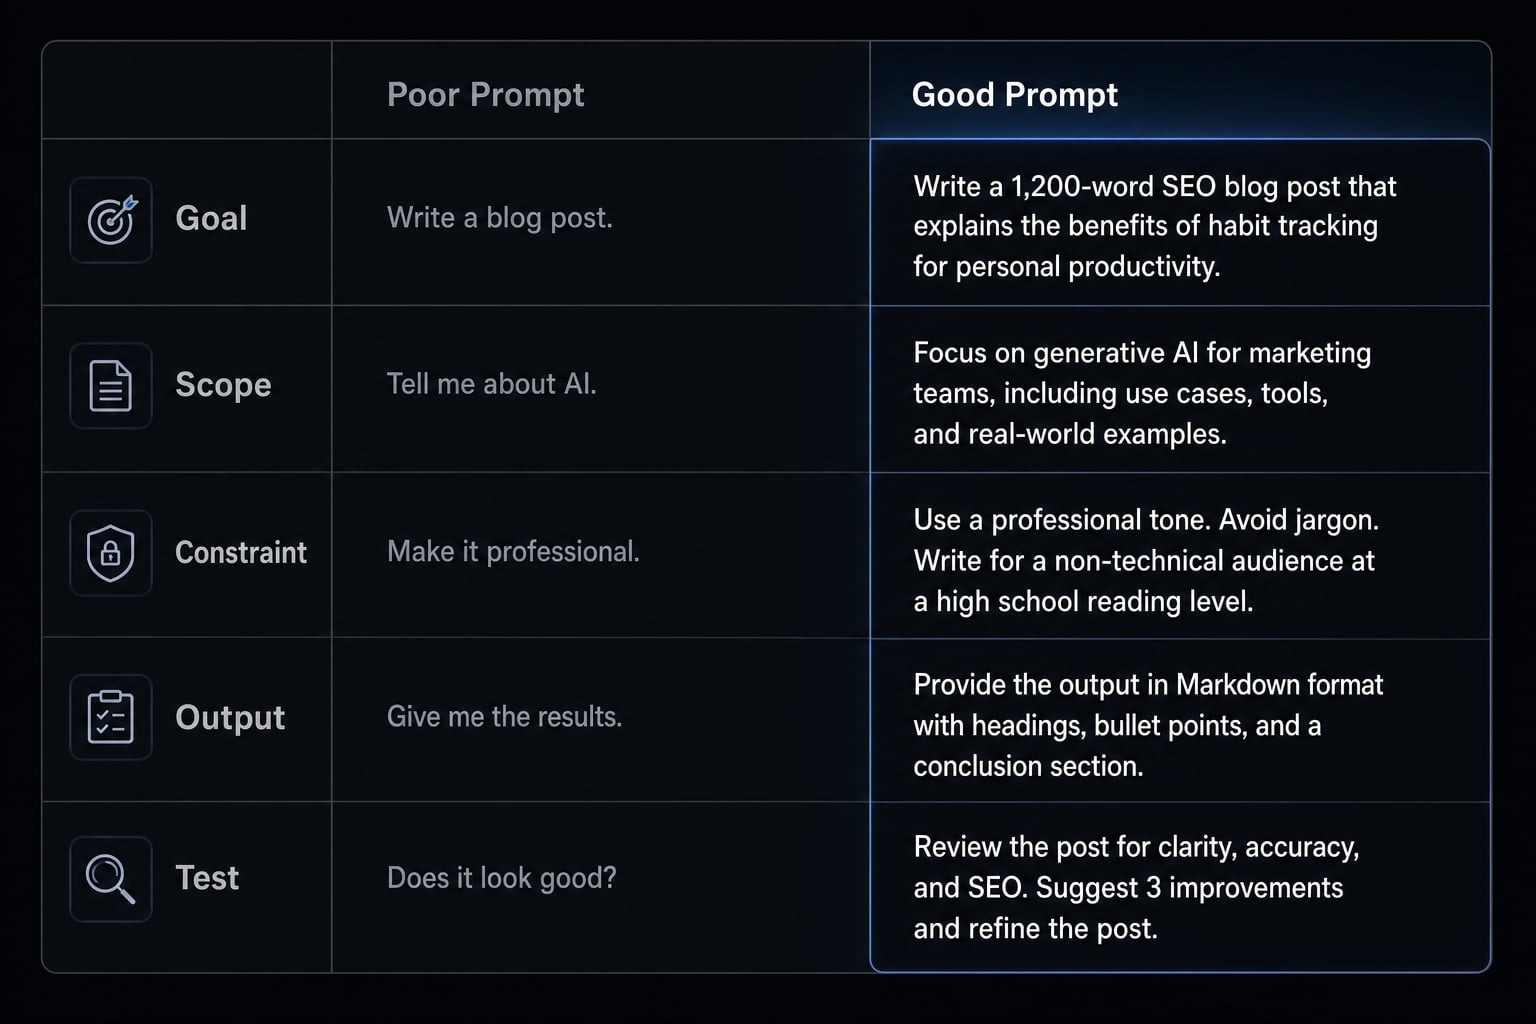
Good prompts are not long for the sake of being long. Good prompts are clear, scoped, and specific. In practice, prompt engineering for coding works best when the model understands the goal, the current state, the limits, and the expected output.
That is what makes a context-rich prompt useful. It gives enough context to reduce guesswork without inviting the model to redesign the whole project. Think of prompt-driven engineering as workflow control, not word count.
Prompt template 1: Planning prompt
I want to build a simple lead tracker for one founder.Target user:A solo founder who wants to add, edit, and delete leads.Desired workflow:Create a lead, update its status, view the list, and remove a lead.Please provide:1. A short requirements summary2. A simple milestone plan3. A suggested file map4. The simplest implementation path5. Any trade-offs I should knowDo not write code yet.
This is a strong planning prompt because it defines the goal before implementation.
Prompt template 2: Small feature prompt
Current app state:The app already shows a lead list and a working input form.Task:Add the ability to edit an existing lead's status.Scope:Keep changes minimal. If possible, only update the relevant files for the lead item and form behavior.Before coding:Explain the simplest approach and any trade-offs first.Then:Make the smallest change set needed to add this feature.
This context-rich prompt works well when some code scaffolding already exists.
Prompt template 3: Debugging prompt
Bug:When I click Save after editing a lead, the UI updates briefly, then resets.Expected behavior:The new status should remain visible after save.Actual behavior:The old status comes back after the page refreshes.Error message:No visible error in the UI, but the console shows a state update warning.Please:1. Identify the most likely cause before writing a fix2. Explain the reasoning briefly3. Propose the smallest viable fix
A good debugging prompt improves debugging speed because it asks for diagnosis before changes.
Prompt template 4: Explanation prompt
Explain this file and flow in plain English.Please cover:1. What each major part does2. Which parts are safe to change3. What might break if edited carelessly4. Any dependencies or assumptions I should know
This explanation prompt helps preserve control by making the logic visible.
The most common vibe coding mistakes
Most frustration comes from workflow mistakes, not from the model alone.
- Asking for the whole app in one prompt Large requests often produce bloated, inconsistent, or hard-to-test output.
- Fix: Ask for a plan first, then build in slices.
- Making the tech stack harder than it needs to be: Extra tools create extra failure points and complicate review of AI-generated code.
- Fix: Reduce complexity until the core workflow works cleanly.
- Not testing early and often: Small issues compound across files and make later debugging slower and more confusing.
- Fix: Use a strict testing loop after every meaningful change.
- Losing control of context: Long chats and weak context management lower output quality and blur the current task.
- Fix: Reset the thread and restate the current task clearly.
- Accepting AI-generated code you do not understand at all: If the logic is opaque, your next fix will likely break something else during the next iteration cycle.
- Fix: Ask the model to explain the logic before you accept the output.
Vibe coding gets faster when the workflow is disciplined, not when the prompts are bigger.
Tools that make vibe coding easier
You do not need a large stack to start. A minimal setup is usually better because it keeps the workflow visible and easier to recover when something breaks.
Tool category | What it does | Beginner recommendation |
|---|---|---|
AI coding editor | Lets you prompt, edit, and review code in one place | Start with one editor such as Cursor |
AI model | Generates plans, code, explanations, and fixes | Use one strong model such as Claude or Gemini |
Version control | Saves checkpoints and supports rollback | Use GitHub from the start |
Optional deployment tool | Publishes a working prototype | Add only when the local version is stable |
Optional voice input | Speeds up rough idea capture | Helpful, but not required |
Recommended starter stack
A practical setup looks like this:
- One editor such as Cursor.
- One strong model such as Claude or Gemini.
- GitHub for checkpoints and rollback.
- Optional voice dictation if speaking is faster than typing.
GitHub Copilot can also fit into the broader ecosystem of AI coding tools, but beginners usually benefit more from one clear workflow than from mixing assistants. MCP can become useful later for more advanced integrations, but it is not necessary for a first project.
Tool choice principles
- Optimize for clarity, not novelty.
- Choose AI coding tools that support editing and iteration.
- Prioritize easy rollback.
- Do not overload your workflow too early.
Brand names matter less than your ability to test, recover, and stay focused.
A lightweight quality checklist before you ship anything
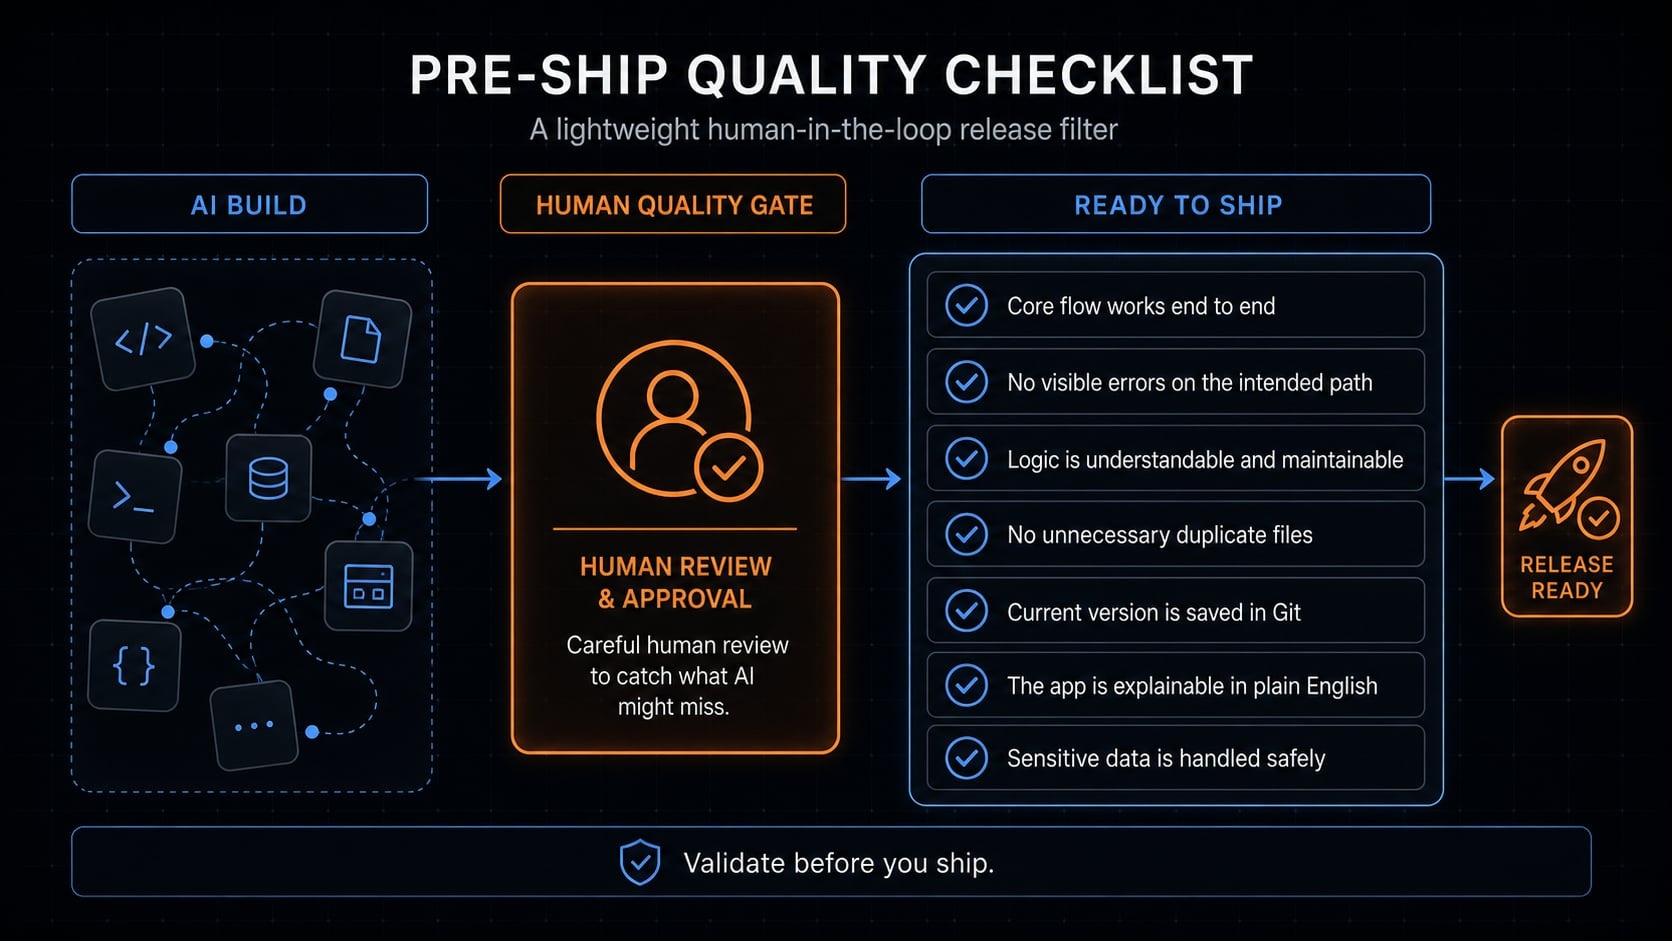
Before sharing or publishing anything built with AI, do a simple quality control pass. This is not enterprise QA. It is a beginner-friendly human-in-the-loop release filter.
Pre-ship checklist:
- The core flow works end to end.
- There are no visible errors on the intended path.
- The logic is understandable enough to update later.
- Files are not duplicated for no reason.
- The current version is saved in version control.
- You can explain what the app does in plain English.
- Sensitive data is not being handled casually.
This kind of validation improves trust and basic maintainability. It does not replace formal testing, but it does reduce the risk of shipping something you cannot support five minutes later.
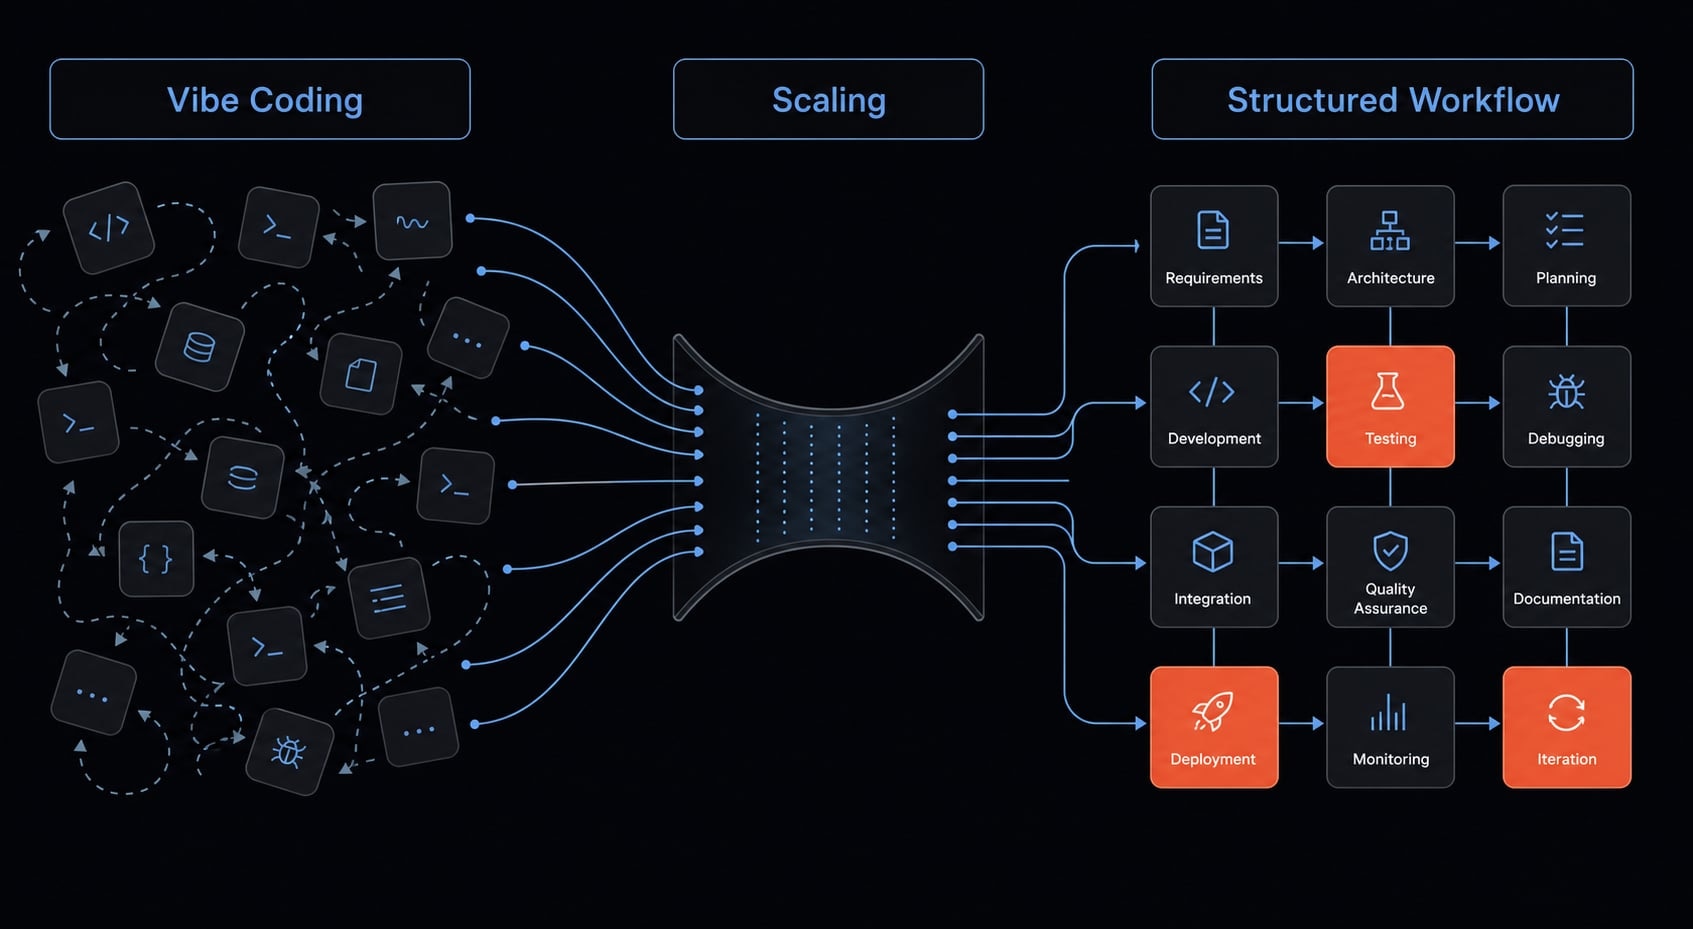
From solo vibe coding to repeatable AI workflows
Once you move beyond one-off experiments, ad hoc prompting starts to waste time. Rewriting the same instructions, rebuilding the same setup, and fixing inconsistent outputs creates drag.
That is usually the point where reusable workflows, structured AI development, and workflow automation start to matter more than raw prompting. Teams often need the same standards, the same setup, and the same review flow every time.
Signs you need more structure:
- Repeating the same prompts again and again.
- Inconsistent outputs across similar tasks.
- Too much setup work every time you start.
- Multiple people need the same workflow.
This is where AI agentic workflows become useful as an operational layer. For teams that want more repeatability, AgentKit is one example of a structured workflow layer built around reusable skills, controlled setup, and repeatable execution rather than prompt recreation every time.
Frequently asked questions
What is vibe coding?
Vibe coding is an AI-assisted development approach where you use natural language to guide an AI model through software creation. Instead of writing code line-by-line, you define the project scope, collaborate on a build plan, and iterate through generation, testing, and refinement cycles with the model.
How does vibe coding differ from traditional coding?
Traditional coding requires manual syntax writing and deep technical architecture knowledge. Vibe coding is intent-first; you act as the architect and reviewer while the AI handles the execution. You focus on logic, testing, and product outcomes rather than syntax, making it significantly faster for rapid prototyping and simple applications.
Is vibe coding suitable for beginners?
Yes, provided you start with small, low-risk projects. Vibe coding excels at creating internal tools, simple landing pages, and CRUD-style apps. It is less suitable for complex, security-heavy, or compliance-driven systems where architectural precision and deep manual debugging are required to prevent critical failures.
What is the most common mistake beginners make?
The most common mistake is asking the AI to build an entire application in a single prompt. This leads to bloated, unstable code that is difficult to debug. To succeed, break your build into tiny, testable slices, ask for a plan first, and validate each feature before moving to the next.
Why is a "human-in-the-loop" approach necessary?
AI models can be overconfident and prone to errors. A human-in-the-loop approach ensures you manually test the app, review code logic for redundancies, and verify security. You must understand the behavior of the software you ship, as the responsibility for performance and quality remains with the developer.
Which tools are best for starting a vibe coding workflow?
For beginners, a minimal setup is best to reduce complexity. We recommend using a high-performing AI-assisted editor (like Cursor), a top-tier model (like Claude Sonnet or Gemini), and GitHub for version control. This combination allows for fast iteration, easy rollbacks, and a clean environment to manage your coding context.
Read more:
- Vibe coder meaning: How AI is changing software development
- Vibe coding SEO: Build AI-powered assets without developers
- 7 practical vibe coding examples: Build apps faster with AI
Conclusion
If you want to learn how to vibe code, start with a small project, clear prompts, and a strict testing habit. The real value of vibe coding is not getting AI to do everything. It is using AI to move faster while keeping scope, quality, and decisions under control.
The safest next step is to pick one low-risk project and follow the workflow in this guide from planning to cleanup. Use the prompt templates, run through the checklist, and focus on one simple build before trying anything bigger. As your process matures, you can turn one-off experiments into more repeatable AI workflows.