Vibe code API: The simplest safe way to connect a real API to an AI-built app
Generating a slick UI with AI is fast, but connecting real APIs-handling secrets, request flows, and deployment-is where vibe coding usually breaks down. Turning a demo into a usable product requires safe API setup and clear prompts. This basic workflow guide covers the easiest APIs to start with, how to prompt your coding tool, and how to avoid beginner mistakes.
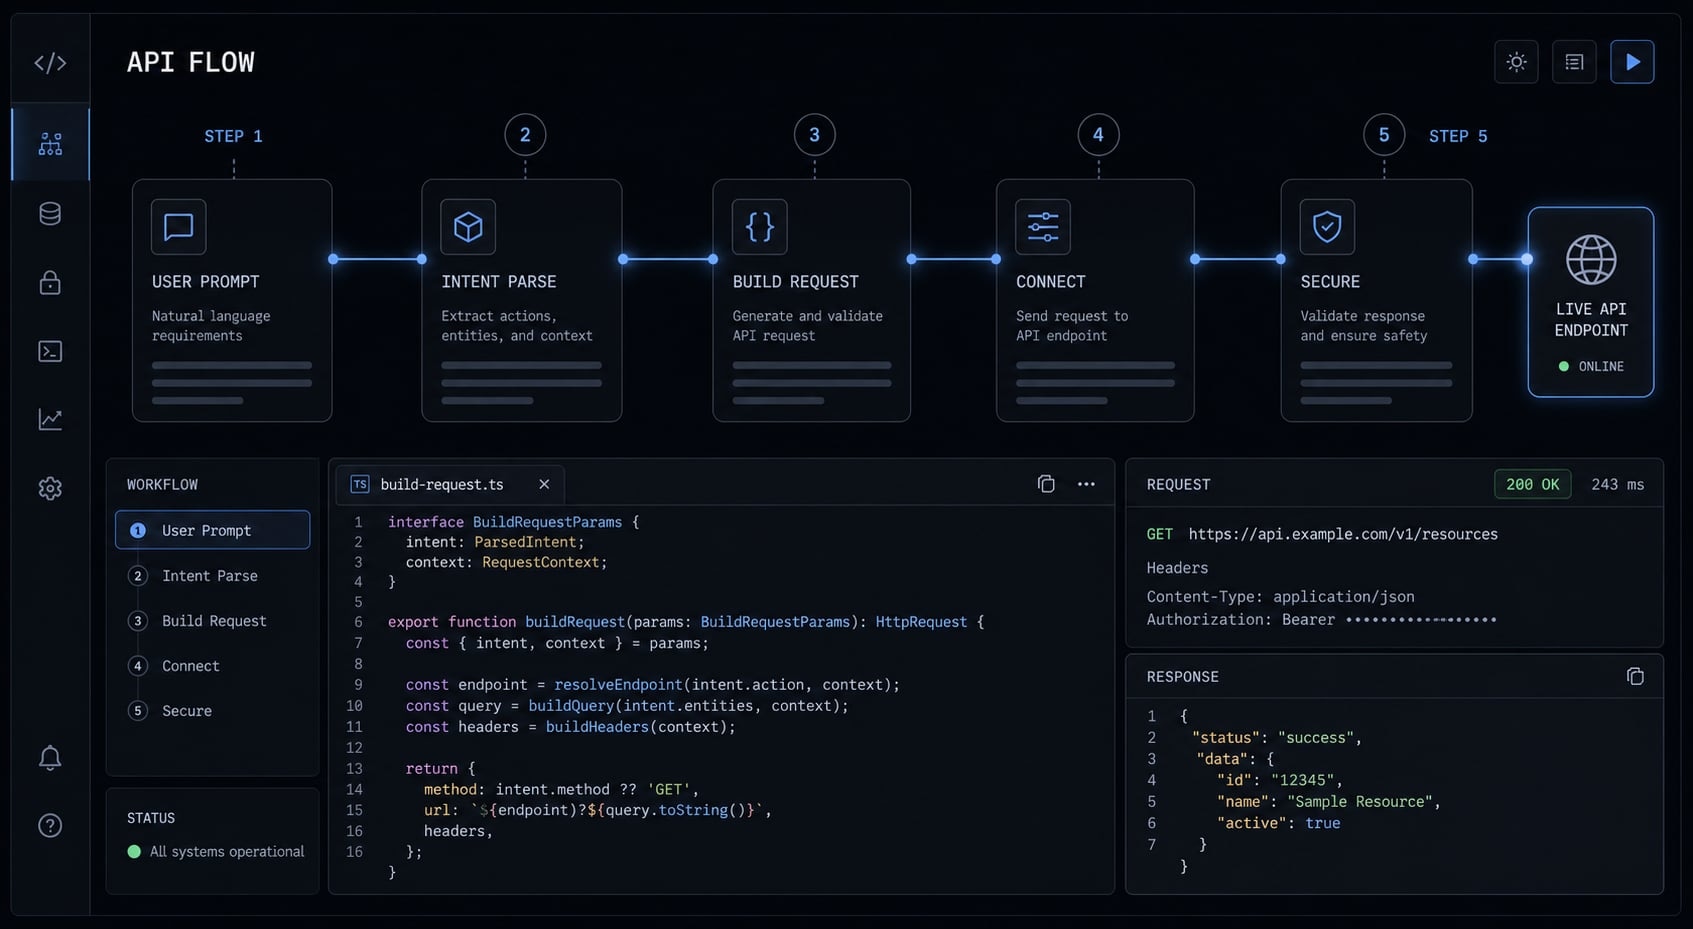
What “vibe code API” means in practice
Vibe code API usually refers to using an AI coding tool to build or modify an app that connects to an external API for a real capability, such as text generation, data lookup, email sending, or payments. It is not a formal standard. It is a practical workflow for faster app building with safe API integration.
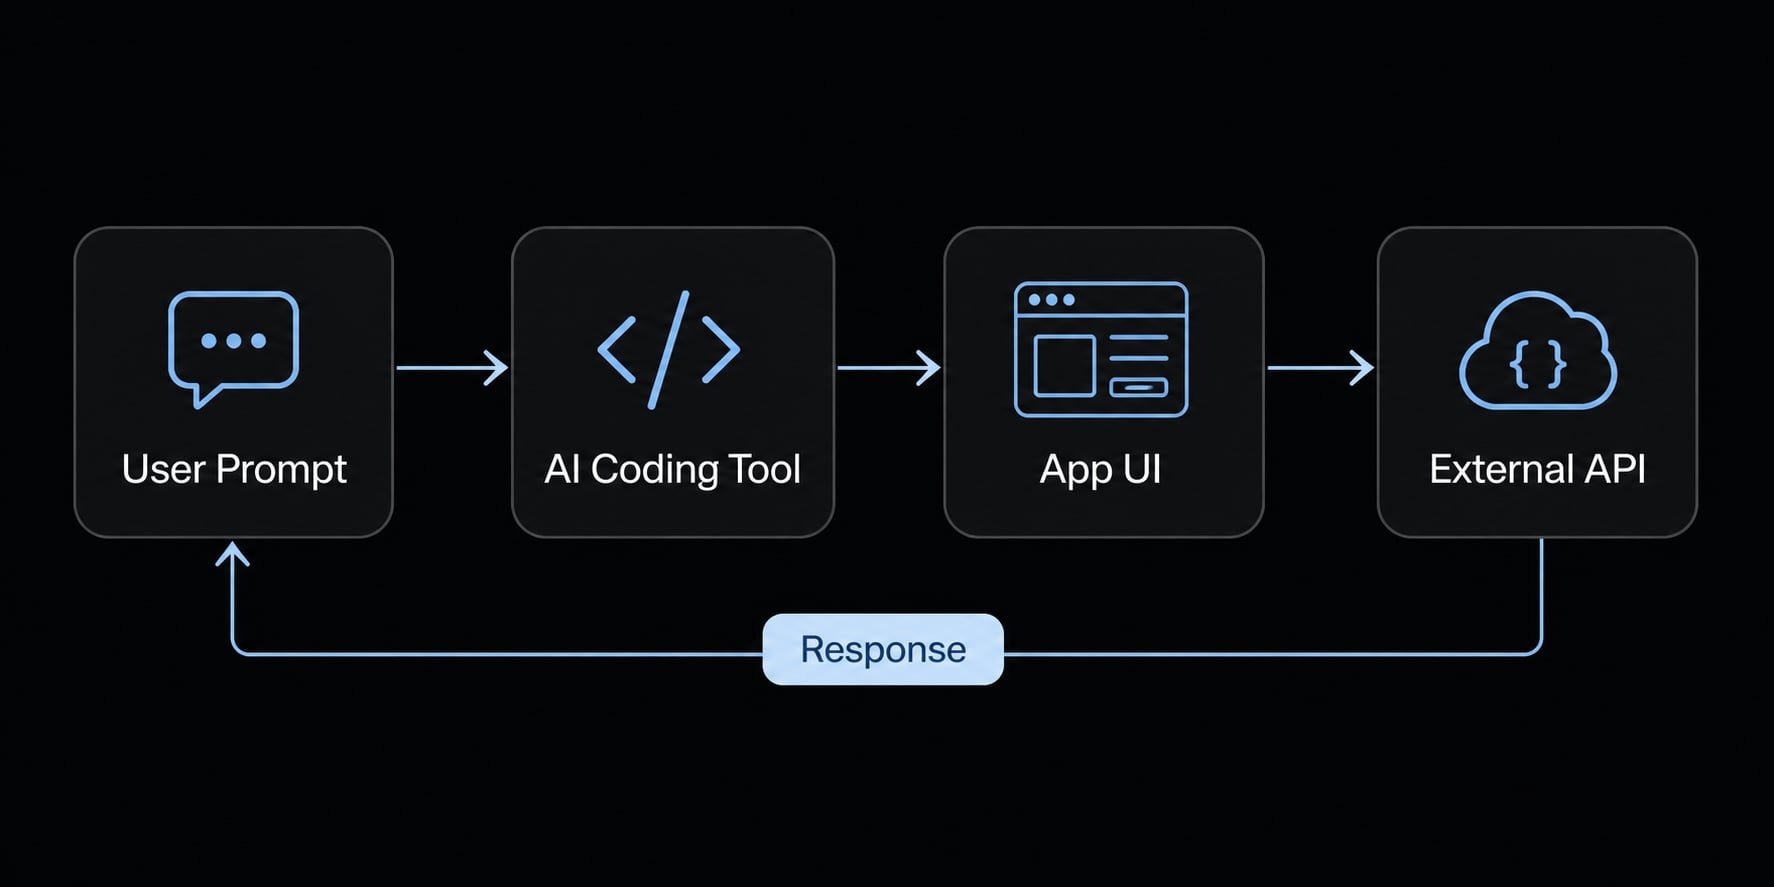
The simplest way to think about vibe code API is this: You describe what the app should do, the tool generates code, and then you refine and test the connection to an outside service. That is why vibe coding is best understood as prompt-driven development, not a programming language.
A common beginner mistake is confusing the API, the API key, and the endpoint. They are related, but they are not the same thing. Many first attempts also assume generated code is safe by default. It is not. Secure credential handling still matters.
Vibe coding is a workflow, not a language
With vibe coding, the builder usually follows a simple loop:
- Describe the feature in plain English.
- Let the tool generate code.
- Refine the behavior with follow-up prompts.
- Test what works and what fails.
This works across tools such as Cursor, Claude Code, Gemini, and Replit.
APIs make apps useful
Without API integration, many AI-built apps stay at mockup level. APIs give them outside capabilities, such as:
- Text generation with the OpenAI API.
- Payment collection with the Stripe API.
- Weather lookup from a public data source.
- Email sending for confirmations or alerts.
- Media generation with tools like ElevenLabs or Runway ML.
Quick glossary
- API: A service that lets one app use features or data from another system.
- API key: A private credential that tells the provider who is making requests.
- Endpoint: A specific URL where your app sends a request.
- Request/response: Your app sends information out, and the API sends data back.
- Environment variables: Secure settings used to store secrets outside the visible code.
Why APIs matter in vibe-coded apps
The main reason API integration matters is simple: AI-generated code often produces a convincing demo, not a working product. A nice interface can look complete in a preview, but if it cannot fetch data, generate content, send messages, or process actions, it is still just a shell.
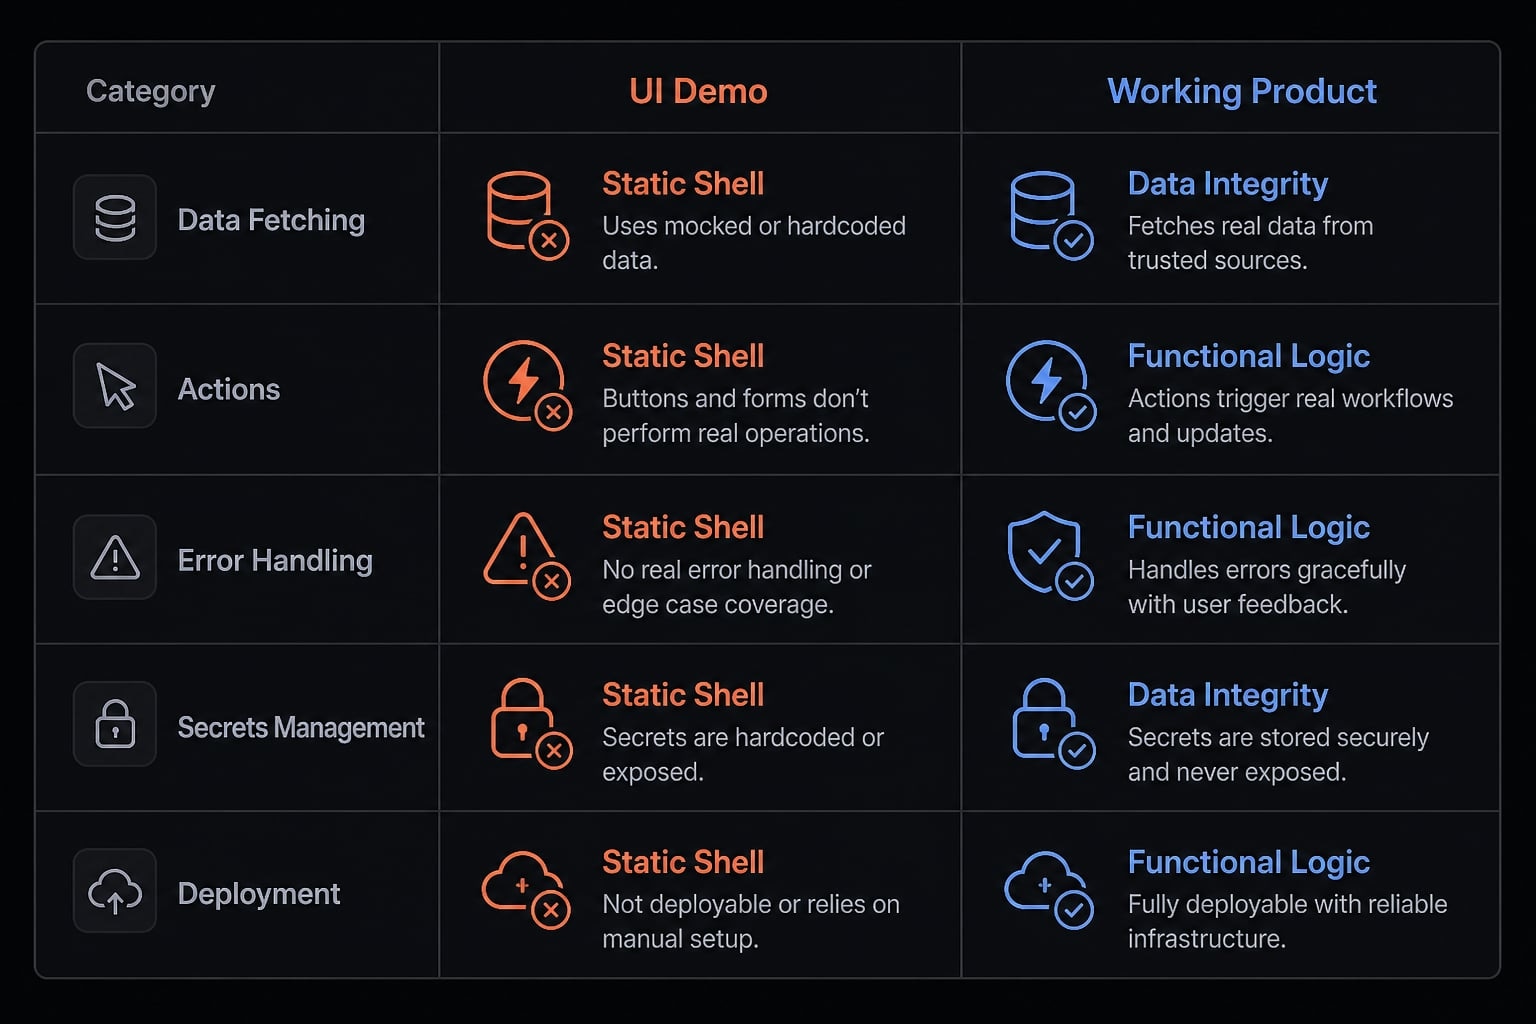
In practice, useful apps need at least one workflow powered by third-party APIs. That is often the turning point between rapid prototyping and a feature people can actually use. Instead of rebuilding everything from scratch, you borrow proven infrastructure and focus on the user experience around it.
From demo to product
Many builders discover this the hard way. The tool can create forms, buttons, and layouts quickly through LLM-based generation, but real product value usually comes from external capabilities. That might be a summary engine, a weather lookup, an email trigger, or a checkout step.
A common pattern looks like this:
- The AI tool builds the UI fast.
- The app still needs data or actions from outside systems.
- API integration becomes the step that makes the app useful.
Good beginner API categories
For beginners, the safest starting categories are:
- Text or LLM APIs for summaries, product copy, or support helpers.
- Public data APIs for weather, news, or finance lookups.
- Email APIs for simple confirmations or alerts.
- Simple payment APIs as a later step, not the first project.
Setup and testing still matter. Even a small app can break if the request flow is unclear or the secret is stored in the wrong place.
The simplest 5-step workflow to use an API in vibe coding
If you want to understand how to integrate third-party APIs using vibe coding, start with a small repeatable process:
- Pick one API for one clear task.
- Create an API key.
- Prompt the tool clearly.
- Test the request/response flow.
- Secure the key before deployment.
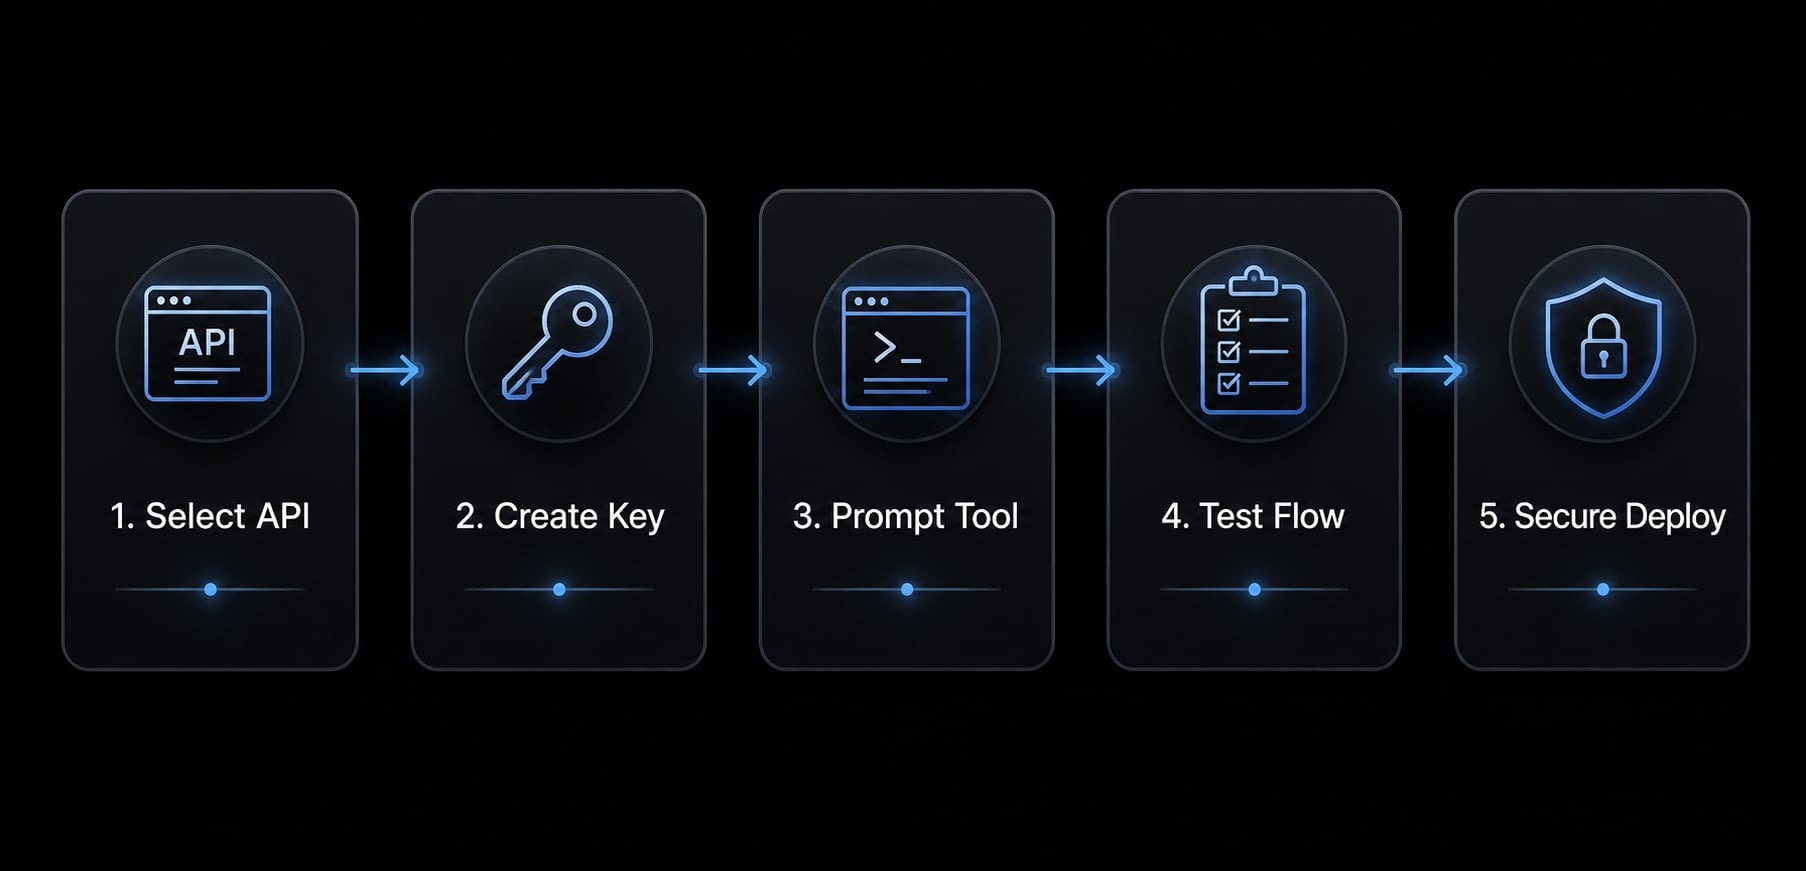
This framework works across major tools because the underlying logic is the same. The tool may differ, but the builder still needs to define the task, handle the api key correctly, validate the request response flow, and recheck everything after deployment.
Step 1: Pick one API for one clear job
For beginners, the safest starting point is one narrow task. For your first build, avoid trying to integrate too many APIs at the same time.
Good first use cases include:
- A product description generator.
- A confirmation email sender.
- A weather lookup tool.
A common beginner mistake is asking the tool to build a whole platform at once. That creates messy code and makes debugging harder. One successful integration is a better milestone than five half-working features.
Step 2: Get access and create an API key
Most providers require you to sign up, create a token, and review basic usage rules. The api key is what identifies your app when it talks to the service.
Before building, check:
- Whether there is a free tier.
- How billing works.
- Whether the provider has rate limits.
- Whether usage is request-based, token-based, or feature-based.
This matters because small tests can become expensive if retries or loops are misconfigured.
Step 3: Tell the coding agent exactly what to build
Vague prompts produce vague code. Your coding agent needs clear instructions about:
- The provider name.
- The user input.
- The expected output.
- Where the key should be stored.
- How errors should be handled.
Use a short prompt like this:
Build a simple app that takes a product name, sends it to the OpenAI API, and returns a short product description. Store the API key in environment variables, not frontend code. Show loading, success, and error states. Handle empty input and failed requests clearly.
Step 4: Test the API response before polishing the UI
In practice, the confusing part is usually not the UI. It is whether the API call actually works. Before adjusting colors, spacing, or animations, test the core flow in live preview.
Validate these cases first:
- A normal request succeeds.
- A failed request shows a clear error.
- Bad input is handled correctly.
- A bad key fails in a readable way.
A clean request response flow matters more than a polished interface. Many first attempts look finished in local preview, then fail later because the app never handled real errors properly.
Step 5: Secure the key and prepare for deployment
This is where beginners often make the most expensive mistake. Never hardcode the API key in visible frontend code. Use environment variables instead.
Do:
- Store secrets in environment variables.
- Keep keys out of public repositories.
- Re-test after deployment.
- Rotate keys if one is exposed.
Do not:
- Paste secrets into frontend files.
- Commit keys to GitHub.
- Assume local success means hosted success.
Many first attempts work locally, then break after deployment because secrets were not configured correctly in the hosted environment.
Managed vs manual API integration: Which one should beginners choose?
Some vibe coding tools handle more of the setup for you. Others expect you to bring your own API key. That creates a simple beginner question: Should the tool manage the integration, or should you handle it yourself?
Managed integrations are faster to start
Managed integrations reduce setup friction. They are often the easiest way to test an idea or create a quick prototype.
Benefits include:
- Faster initial setup.
- Fewer configuration steps.
- Good fit for first experiments.
The tradeoff is less control. You may be limited to supported providers, hidden configuration layers, or less transparent usage details.
Manual API setup gives more control
With manual setup, you bring your own API key, choose the provider, and control more of the developer workflow. Benefits include:
- More provider flexibility.
- Clearer credential ownership.
- Better long-term control.
- Easier migration later.
The tradeoff is more responsibility. You handle secrets, testing, and setup details yourself.
Criterion | Managed integration in a vibe coding tool | Manual API setup with your own key |
|---|---|---|
Setup speed | Very fast | Moderate |
Technical control | Limited | High |
Provider flexibility | Limited to supported integrations | Broad |
Security responsibility | Partly abstracted | Mostly on you |
Cost visibility | Sometimes less transparent | Usually clearer |
Best use case | Fast prototypes | Real products or custom workflows |
For most beginners, managed integrations are a sensible starting point. For long-term products, manual setup usually provides better control and cleaner ownership.
Best first APIs to use in a vibe-coded app
Start simple. The best beginner APIs usually return predictable text or JSON, are easy to test, and have clear docs or an API playground. That reduces confusion and helps you validate one feature quickly.
Text generation APIs
Best for:
- Product description generators.
- Summary tools.
- Support helpers.
The OpenAI API is a common starting point because the input and output are easy to understand. You send text in, then receive structured text back.
Data APIs
Best for:
- Weather lookup.
- News summaries.
- Basic finance checks.
A weather API is often the safest first example because the output is predictable and easy to display in a small app.
Email or messaging APIs
Best for:
- Confirmation messages.
- Notification flows.
- Simple outreach automation.
These are useful once you are comfortable with one basic request and response cycle.
Voice, image, or video APIs
Examples include:
- ElevenLabs for voice.
- Runway ML for video.
These are powerful, but they are usually heavier, slower, and costlier. They are better as second projects, not first ones. Media APIs also make debugging harder because the outputs are less lightweight than simple text or JSON.
Prompt templates for connecting APIs with AI coding tools
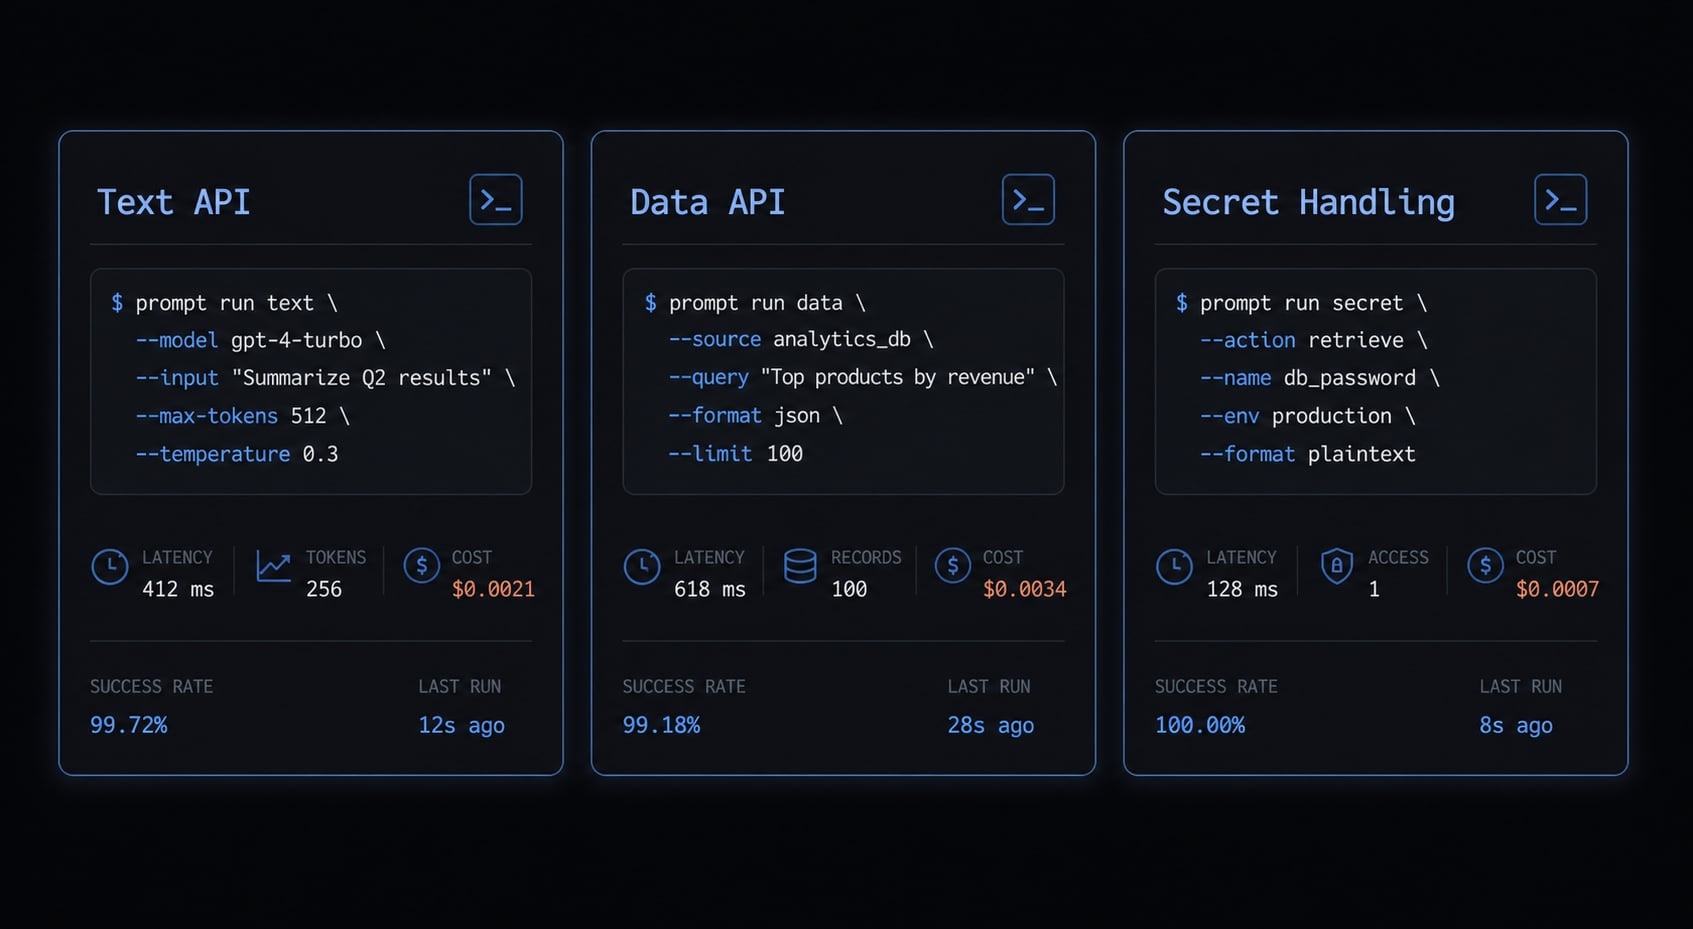
Good prompt templates reduce rework. They help the coding agent understand the feature, the expected output, the error states, and how secrets should be stored. If your tool supports persistent system instructions, you can also use them to enforce safe defaults across the session.
When people talk about frontend-backend orchestration, beginners do not need the full architecture lesson. The key point is simpler: The tool should know where the user enters data, where the API call happens, and how the result is displayed.
Prompt template for a text generation API
Build a simple web app with one text input and one submit button. Send the input to the OpenAI API and return a short structured response with a title and summary. Show loading and error states. Store secrets in environment variables and avoid exposing them in client-side code.
Prompt template for a public data API
Create a small app that accepts a city name, fetches weather data from a public API, and displays the current condition and temperature clearly. Handle empty input, failed requests, and missing results. Keep the response easy to read in a basic mobile-friendly layout.
Prompt template for secrets and error handling
Refactor this app so API calls use environment variables for secrets, not frontend code. Add graceful handling for invalid API keys, failed requests, and timeout errors. Show a clear fallback message to the user and keep secret values out of logs and visible UI.
These prompt templates are intentionally short. Strong API integration prompts are specific, not long.
Common mistakes to avoid with vibe code APIs
Most problems with vibe-coded apps are not dramatic engineering failures. They are small mistakes that compound: Poor api key security, weak prompts, skipped testing, and billing surprises.
The most common mistakes are:
- Exposing keys in frontend code.
- Skipping request/response testing.
- Using vague prompts.
- Ignoring pricing and retry behavior.
- Not retesting after deployment.
One stable integration is more valuable than a flashy but fragile demo. That is especially true when securely managing API keys in AI-generated applications.
Security basics
Use this checklist:
- Store secrets in a
.envfile or secure host settings. - Use environment variables.
- Keep secrets out of frontend code.
- Never commit keys publicly.
- Rotate leaked keys immediately.
A common beginner mistake is assuming the generated project structure is safe by default. It often is not. API key security still depends on how you store and deploy credentials.
Cost basics
Use this checklist:
- Understand request-based pricing.
- Watch rate limits.
- Avoid accidental retries or loops.
- Test with small usage first.
- Re-check hosted behavior in your deployment workflow.
Many builders only test the happy path. Then a retry loop, a broken error state, or a hosted mismatch creates avoidable costs. API key security and billing awareness matter even for small personal projects.
A practical example: Building a small API-backed app with a vibe coding tool
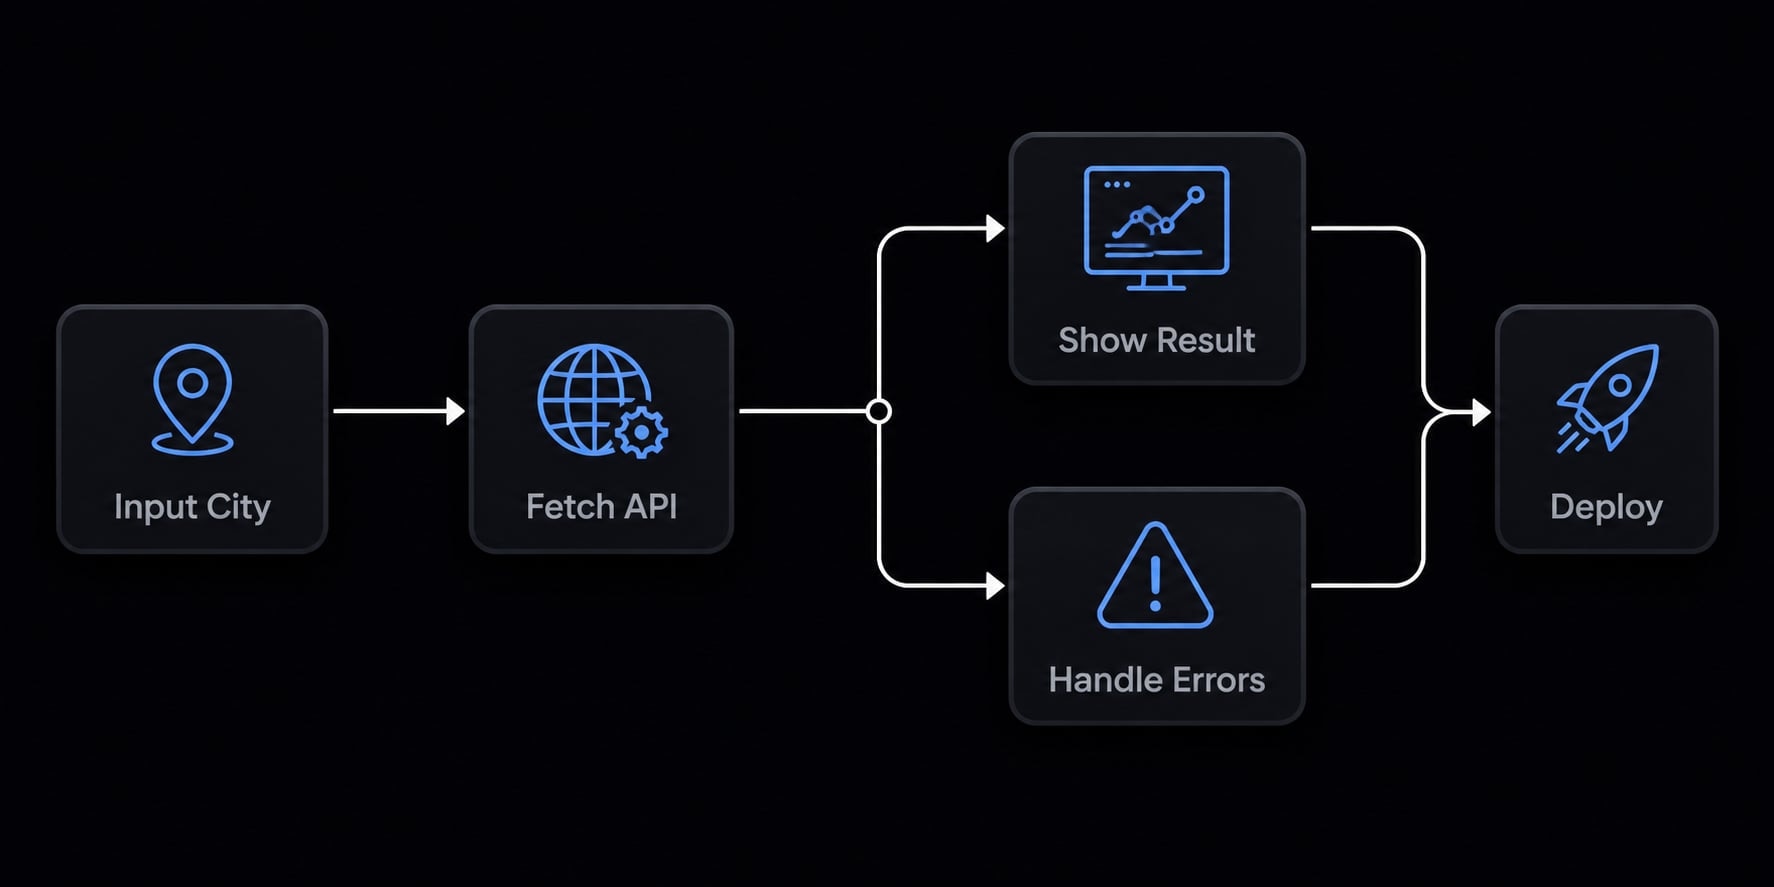
A good practical example is a Weather Summary App. It is a small API-backed app with low complexity, predictable output, and clear success criteria.
Setup sequence:
- Define the feature: Enter a city and get a simple weather summary.
- Choose one API: A public weather service.
- Ask the tool to build a basic form and request flow.
- Test the result in live preview.
- Store the key safely if the provider requires one.
- Confirm the app still works after deployment.
Success criteria:
- Valid input returns a weather result.
- Invalid input fails clearly.
- The secret is stored safely.
- The hosted app behaves the same as the local version.
This is the right first milestone. Do not judge success by polish. Judge it by whether one complete request flow works reliably from input to response.
Frequently asked questions
What does "vibe code API" mean?
"Vibe code API" refers to the workflow of using AI coding agents to build applications that connect to external data or services via an API. It is not a formal programming language; rather, it is a prompt-driven process where you describe desired app functionality and let the AI handle the API integration logic.
Why do I need an API for my AI-coded app?
AI-generated code often creates a functional UI, but it remains a static demo without an API. APIs allow your app to perform real-world tasks, such as generating text, fetching live data, sending emails, or processing media, transforming a prototype into a useful product.
How do I safely handle API keys when vibe coding?
Never hardcode your API keys directly into your project files. Instead, always store keys in .env files or your platform’s secure environment variable settings. This practice ensures your credentials remain private and are not accidentally exposed when you commit code to public repositories.
What is the simplest workflow to integrate an API?
- Pick one specific API for a single task.
- Generate an API key from the provider.
- Prompt your coding agent to build the integration.
- Test the request and response flow in your local preview.
- Secure your key in environment variables before deploying.
Managed vs. manual API integration: Which is better?
Managed integrations are faster for quick experiments and reduce setup friction, while manual setup offers greater control, flexibility, and deeper understanding of how the service functions. For beginners, start with managed integrations; transition to manual setups as your project requirements and technical confidence grow.
What are the most common mistakes beginners make?
The most frequent errors include exposing API keys in public frontend code, using overly vague prompts for the AI, skipping request/response testing, and ignoring rate limits or cost implications. Always validate how your app handles both successful API calls and potential error states.
Read more:
- 7 practical vibe coding examples: Build apps faster with AI
- Vibe coding SEO: Build AI-powered assets without developers
- Vibe code Android: How to build apps faster with AI prompts
Conclusion
In practice, vibe code API means using an AI coding tool to build an app that connects to one real outside service. The minimum safe workflow is straightforward: Choose one API, store the key safely, prompt clearly, test the API integration early, and secure everything before deployment.
For beginners, that is enough. You do not need a complex stack or a perfect product to get started. One stable integration teaches more than an ambitious multi-API demo. If you want a repeatable next step, use a small checklist, reusable prompt set, and environment-variable workflow.