Mastering the vibe coding workflow: A practical delivery guide
A practical vibe coding workflow: From idea to production
As AI coding tools accelerate generation, the real challenge is verification, not creation. This practical workflow for developers and small teams organizes AI-assisted development around reusable briefs, approval boundaries, validation evidence, and recovery checkpoints—turning rapid generation into a repeatable, inspectable release process.
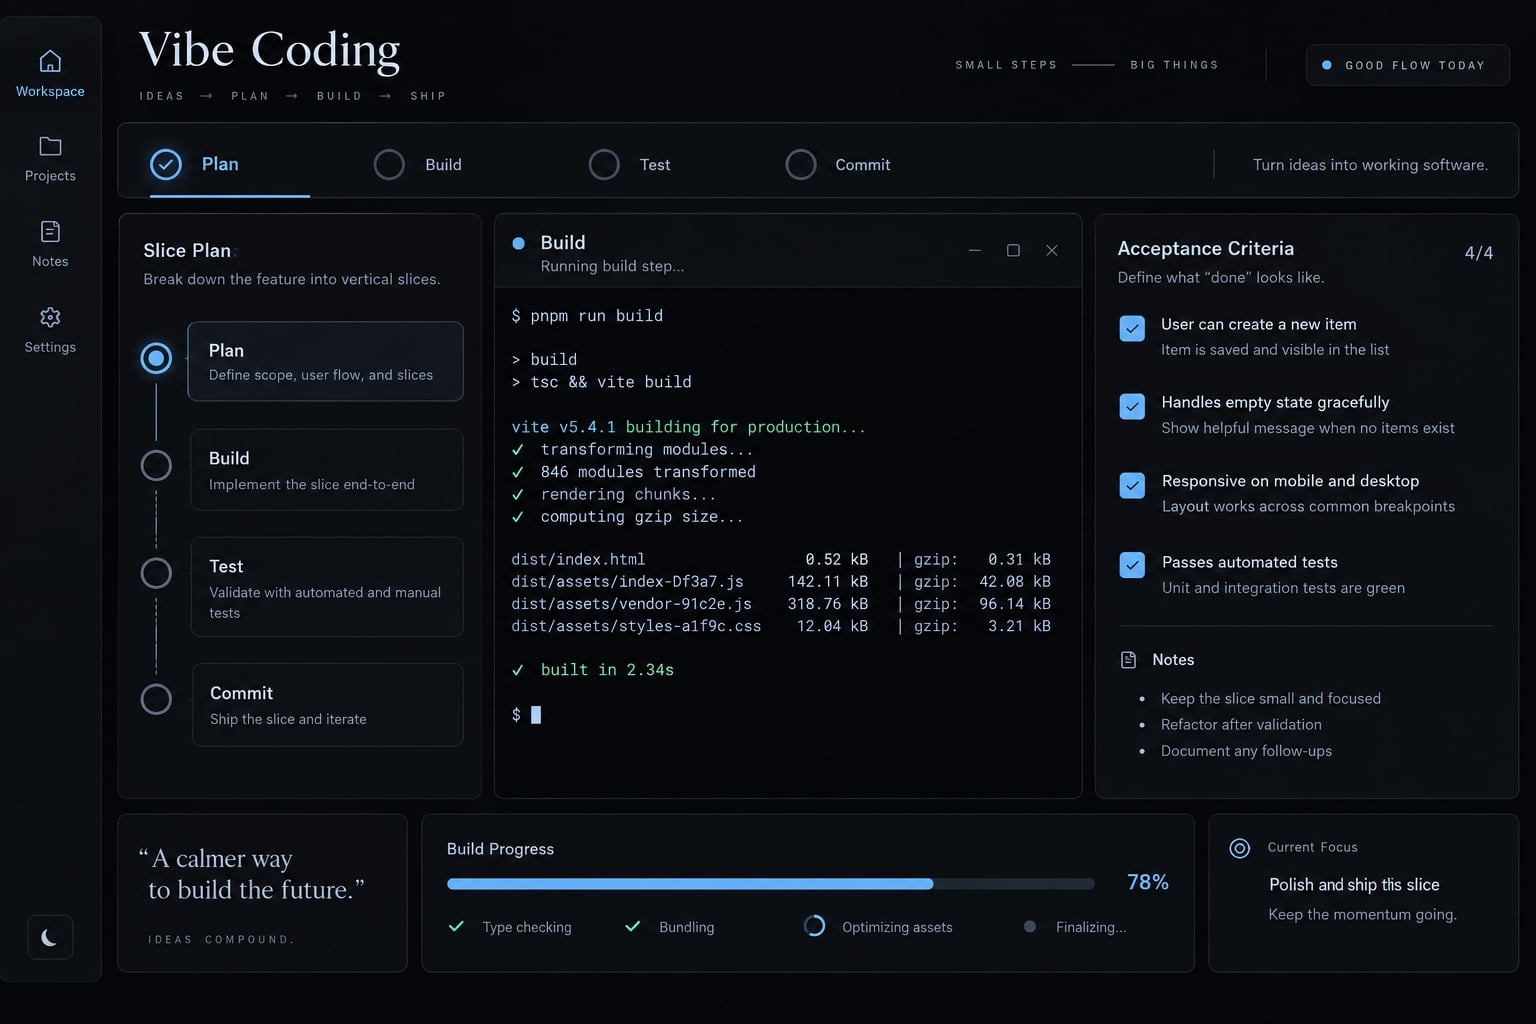
What is a vibe coding workflow?
A vibe coding workflow is a repeatable process for turning natural-language requirements into software through planning, code generation, testing, review, and documentation. It supplies relevant project context, limits each change, and keeps humans in control of product decisions, access permissions, validation evidence, and release approval throughout delivery.
Here, “structured vibe coding” is a practical framing, not a standardized methodology. The original loose framing emphasizes relying on generated implementation, potentially without close code inspection. This guide adds engineering controls and overlaps substantially with disciplined AI-assisted development. Not all AI-assisted programming is vibe coding.
Unstructured versus structured vibe coding
An AI coding workflow should match its purpose: Exploration and production delivery need different controls.
Area | Unstructured approach | Structured approach |
|---|---|---|
Requirements | Broad feature request | Observable acceptance criteria |
Scope | Expands during prompting | Explicit task boundaries |
Context | Whatever chat contains | Relevant, current project context |
Execution | Edit immediately | Inspect, plan, approve |
Validation | Accept apparent success | Observe checks and inspect changes |
Recovery | Keep requesting repairs | Preserve working checkpoints |
Release | Deploy when it looks finished | Review evidence and approve |
Structure improves inspectability; it does not remove risk.
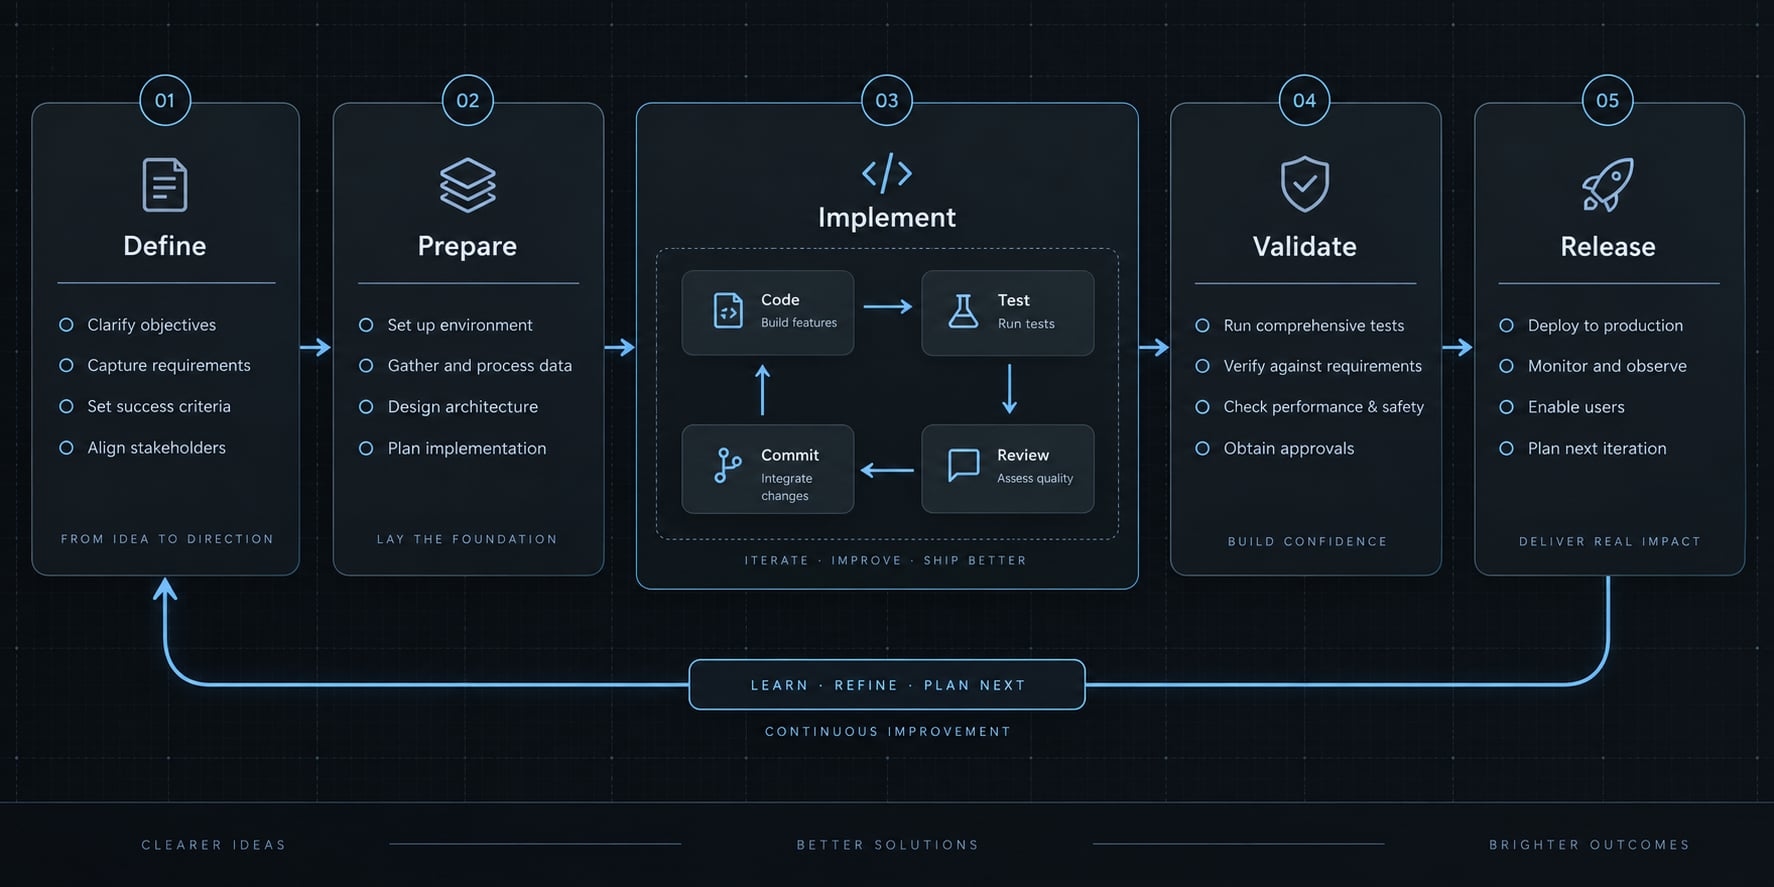
The workflow at a glance
- Define the intended outcome.
- Prepare repository context and permissions.
- Approve a bounded implementation plan.
- Build one end-to-end slice.
- Test, review, and commit.
- Preserve context and approve release.
- Monitor behavior and feed back findings.
These seven actions form the five implementation stages below. The macro loop runs from product outcome through release and feedback. The micro loop implements, tests, reviews, and commits one slice.
Step 1: Define the outcome before asking the AI to code
Specify behavior before implementation. A feature label leaves the agent to infer business rules, permissions, and failure handling. Those decisions belong to the product owner and engineering team.
Write a minimum viable feature brief
A product requirements document (PRD) describes intended product behavior. A small change usually needs only a compact feature brief, not extensive documentation.
The following display-name feature is illustrative, not a documented implementation or customer result.
Feature: Update my workspace display name.User outcome: Change how my name appears in this workspace.In scope: Existing profile form, server update, stored value, feedback.Out of scope: Email, roles, invitations, global identity changes.Acceptance criteria:- Authorized members can update only their own workspace profile.- Valid changes persist and show success feedback.- Invalid or unauthorized changes leave stored data unchanged.Constraints: Reuse existing authentication, field, and UI patterns.Validation: Server tests, persistence checks, and browser verification.
Authentication, billing, permission changes, and database migrations require additional scrutiny. A short brief does not make a sensitive change low-risk.
Convert subjective requests into testable acceptance criteria
Weak: “Make profile editing intuitive and secure.”
Specific example requirement: “An authenticated, active workspace member can update only their own display name. After trimming surrounding whitespace, accept 1–80 characters under the application’s documented counting rule. Reject invalid input server-side. Show success only after saving, preserve the value after refresh, and deny another member’s update attempt without changing data.”
The length limit is an example product choice, not a universal standard. Decide how unusual Unicode characters count before implementation.
Also specify failure feedback: A failed save should not display success or imply that unsaved changes persisted. Clearer constraints reduce ambiguity; they do not make model behavior deterministic.
Define “done” before implementation begins
Use separate readiness and completion checks:
- Ready to start: Outcome, scope, acceptance criteria, risks, and accountable owner approval are clear.
- Definition of done: Acceptance checks pass, required validation is observed, the diff is reviewed, and the handoff is updated.
This distinction prevents “the agent finished editing” from becoming the team’s completion standard.
Step 2: Prepare the repository and project context
Give the agent current, relevant context and independently restricted access. Never paste secrets or real customer data into prompts, project instructions, or example fixtures.
Create a short Instruction file for coding agents
Keep durable project rules concise and actionable:
Purpose and stack: [Application purpose and actual stack]Architecture: [Relevant module boundaries and existing patterns]Restricted scope: [Files or systems requiring separate approval]Approval rules: No new dependencies or public API changes without approval.Validation: [Verified project commands for applicable checks]Completion report: Changed files, executed checks, outcomes,limitations, and unresolved questions.
AGENTS.md, CLAUDE.md and Cursor rules are tool-specific instruction patterns—not interchangeable filenames. Before adopting one, check the installed tool’s official documentation for discovery, scope, precedence, and limitations.
Relevant references include OpenAI’s Codex instructions documentation, Anthropic’s Claude Code memory documentation, and Cursor’s Rules documentation. Avoid assuming that a rule recognized by one tool applies to another.
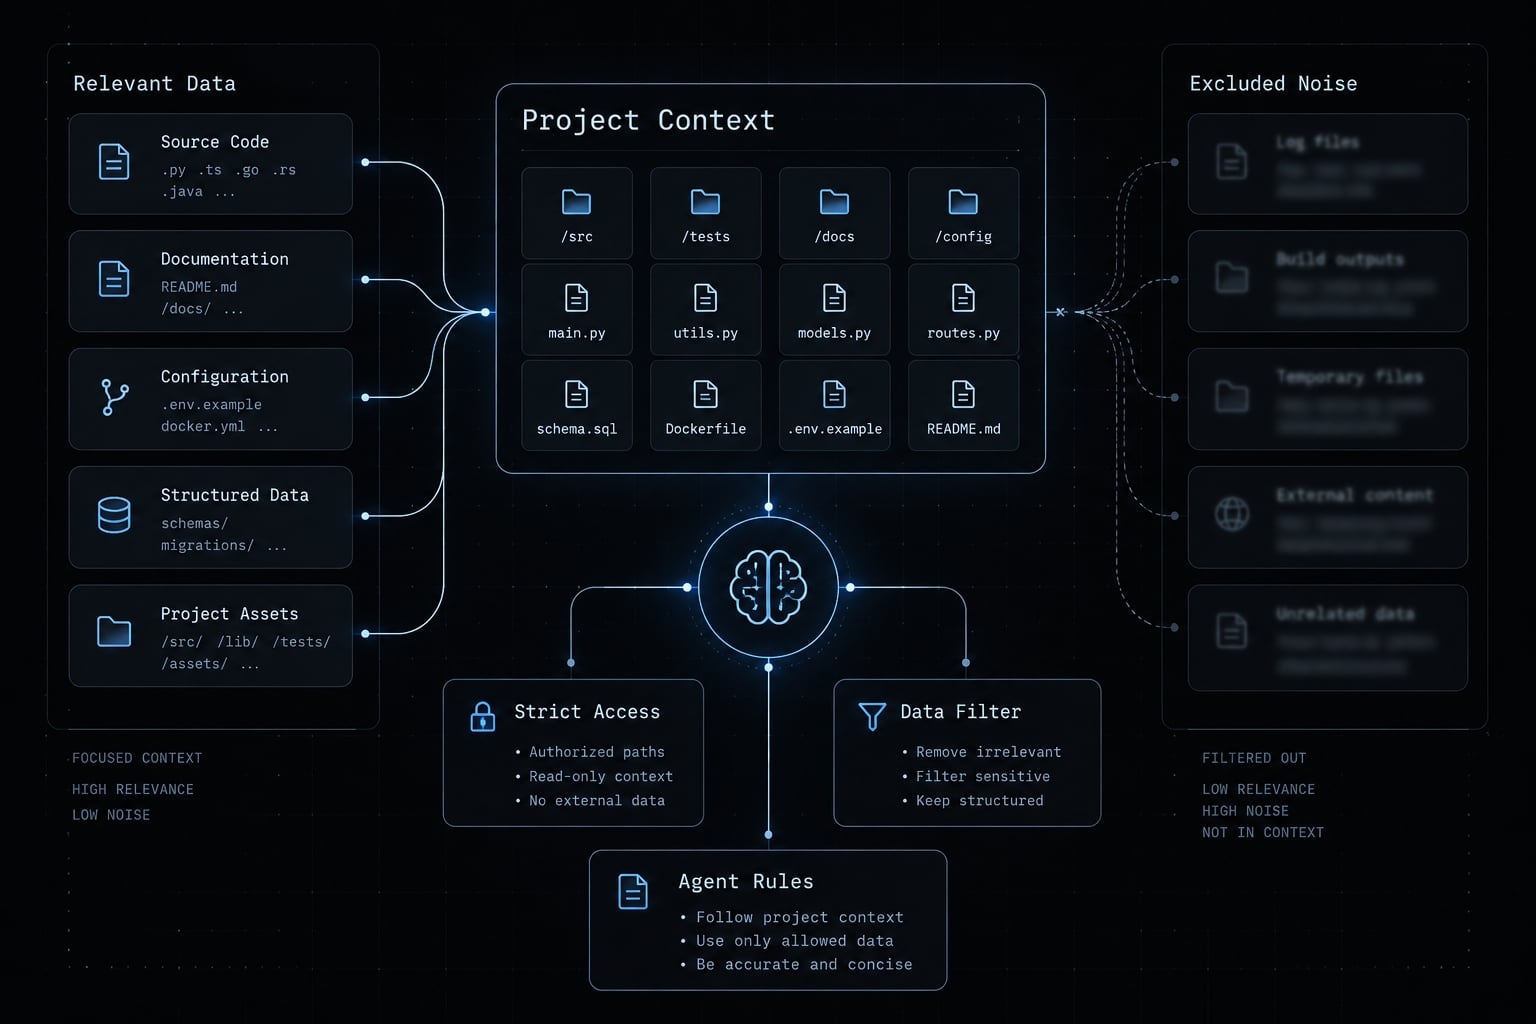
Give the agent relevant context, not the entire repository
Start with the current brief, relevant modules, existing tests, schemas, shared interfaces, and applicable project rules.
Exclude generated files, obsolete specifications, and noisy logs. The context window—the information available to the model for a request—should contain material that helps resolve the current task.
Allow targeted exploration when the agent needs additional files. The goal is not to prohibit discovery, but to avoid indiscriminate repository dumping. Long sessions can introduce context drift, particularly when earlier decisions become buried or stale.
Establish a safe starting point
Before edits:
- Record baseline test results, including existing failures.
- Create a feature branch or worktree.
- Preserve unrelated changes and identify their owner.
- Use synthetic or sanitized test data.
- Restrict credentials, filesystem access, network access, and production permissions.
- Require approval for sensitive commands where supported.
A branch or worktree isolates development history or working files; it is not a security sandbox. Written instructions guide behavior but do not enforce access boundaries.
Step 3: Plan and build one vertical slice at a time
Approve the implementation plan before allowing edits. Planning exposes unsupported assumptions while changes are still inexpensive to reconsider.
Ask for a plan before allowing file changes
Use this tool-agnostic prompt:
Inspect the feature brief and relevant repository files.Do not modify files or run state-changing commands.Return an implementation plan covering:1. Expected behavior.2. Likely files to change.3. Existing patterns to reuse.4. Required validation.5. Risks, assumptions, and unresolved questions.Wait for explicit approval before editing.
Review scope, assumptions, unnecessary dependencies, and unresolved product decisions. If the plan introduces a new profile service for a small existing-field update, ask why the current architecture cannot support it.
Plan approval authorizes a bounded attempt. It does not establish that the proposed implementation is correct.
Break features into vertical slices
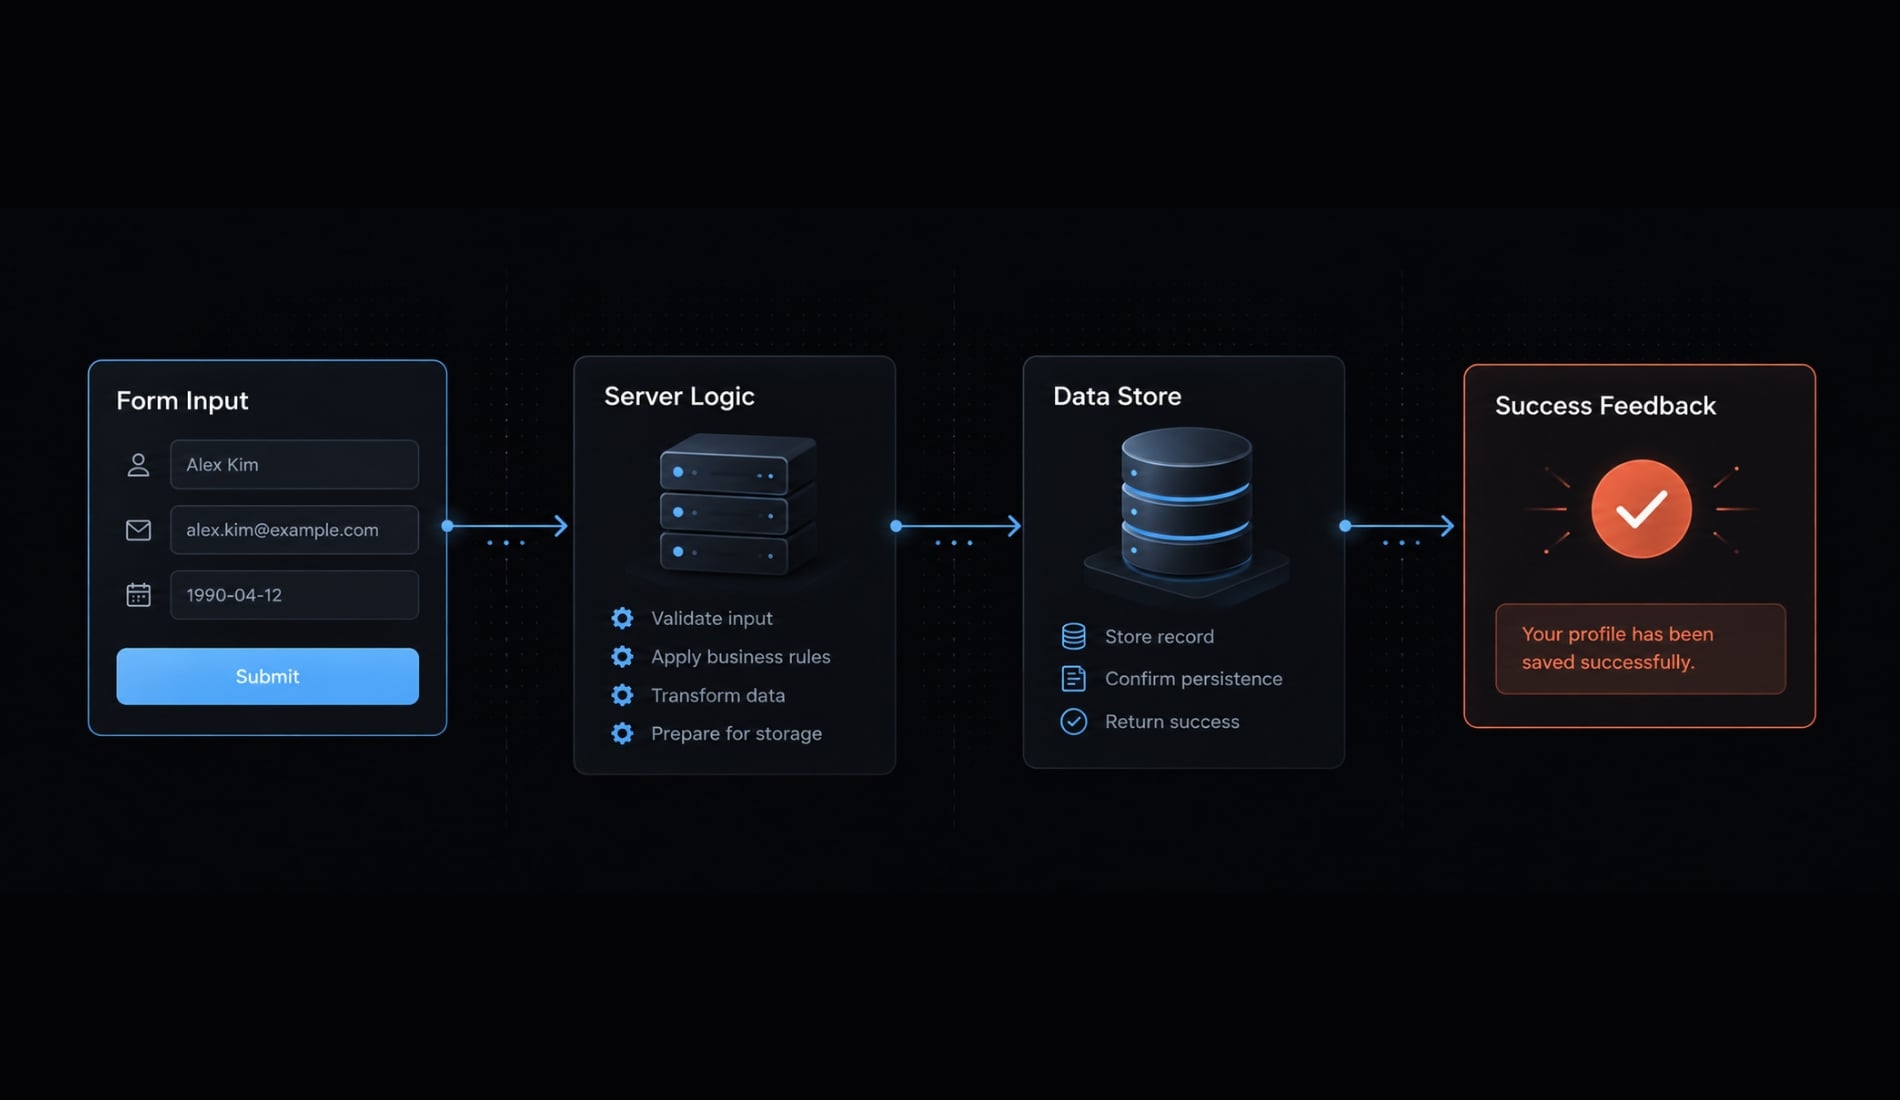
A vertical slice delivers one observable behavior across the necessary application layers, from user action through server processing and stored data to feedback. Unlike disconnected layer-by-layer work, it creates an end-to-end result that can be exercised and reviewed.
For the illustrative display-name update:
- Confirm the existing workspace-profile field.
- Implement the authorized server update.
- Validate input before saving.
- Connect the form and success or failure feedback.
- Test accepted, invalid, and unauthorized updates.
These are components of one vertical slice, not five separate slices. Do not introduce a database migration if the field already exists.
Effective task decomposition reduces uncertainty, not merely file count. A one-line authorization change can carry more risk than a larger presentation change.
Use explicit task boundaries
Objective: Deliver the approved display-name update.Allowed scope: Existing profile UI, server operation, related tests.Prohibited scope: Roles, authentication redesign, new dependencies.Required checks: [Approved commands and behavior checks]Completion response: Diff summary, observed results, remaining risks.
Stop when requirements are unclear or the task reveals an architecture conflict, unexpected public API change, new infrastructure, destructive migration, or unresolved security decision.
Ask the accountable owner to approve a revised plan. Pair written task boundaries with available permission controls rather than relying on prompt wording alone.
Step 4: Run the Micro-Loop—Implement, Test, Review, and Commit
Accept observed results, not the agent’s success narrative. Review both behavior and the code diff—the actual changes between revisions—before recording a working checkpoint.
Use a test-first loop where failure would be costly
Test-driven development (TDD) starts with a test that exposes missing behavior:
- Write or update the test.
- Confirm the expected failure.
- Make the smallest implementation.
- Run relevant tests.
- Refactor after behavior stabilizes.
- Rerun affected checks.
A failure caused by broken setup is not the intended “red” stage. Confirm that the test fails because the required behavior is absent.
Prioritize TDD for permissions, business rules, calculations, and data changes. Every visual adjustment does not require it.
Review generated assertions yourself. Tests can encode the same misunderstanding as generated code. Check that the agent has not deleted or weakened assertions to obtain a pass.
Apply a practical validation ladder
Check | What it establishes |
|---|---|
Lint and formatting | Style consistency and some detectable defects |
Type checking | Supported static type constraints |
Unit tests | Selected isolated rules and functions |
Integration tests | Selected interactions between components |
End-to-end tests | Selected complete user journeys |
Visual and manual checks | Presentation, feedback, and exploratory behavior |
This validation ladder is a practical grouping, not a mandatory universal sequence. Select checks according to the change and its risk.
Require actual terminal or continuous integration (CI) output tied to the current revision and environment. Record commands, exit status, failures, and skipped checks. A green suite establishes tested behavior, not overall correctness or security.
Review the behavior and the code diff
Use nine code review questions:
- Does behavior meet the approved criteria?
- Are there unrelated changes?
- Are new dependencies justified?
- Is authorization enforced server-side?
- Is input validated and safely rendered?
- Could sensitive data leak?
- Are failure and persistence paths correct?
- Were meaningful tests preserved and regression testing completed?
- Can a maintainer explain and support the implementation?
For the example, attempt a cross-account update using another member’s identifier. A successful self-update alone does not establish ownership enforcement.
Commit working checkpoints and escape debugging loops
Create Git commits after coherent changes pass required checks and code review.
A repeated repair loop—sometimes called an “AI doom loop”—can expand the diff while breaking previously working behavior. If display-name fixes start changing login behavior:
- Stop further edits.
- Preserve logs and valuable uncommitted work.
- Inspect the expanded changes.
- Restore or revert to a known-good checkpoint.
- Restart with a narrower hypothesis and concise brief.
Git’s documentation distinguishes restoring files from reverting committed changes. Choose an operation that preserves unrelated work. Code rollback does not restore database state; data recovery needs its own plan.
Step 5: Preserve context and pass a production-readiness gate
Local success is task-level evidence, not release approval. Production readiness also requires operational checks, clear ownership, and a credible recovery plan.
Create a concise session handoff
Store durable decisions outside transient chat:
Completed: [Behavior delivered]Files changed: [Paths and purpose]Decisions: [Important choices and rationale]Validation: [Commands, outcomes, revision, environment;include failed or skipped checks]Known limitations: [Unresolved risks and missing evidence]Next recommended task: [One bounded action]
Keep the session handoff short enough to read before continuing. Store lasting architectural or product decisions in the repository, but avoid generated documents that merely restate code.
For the example, record whether display names are workspace-specific and how input length is counted. Those decisions affect future work.
Run the minimum production-readiness gate
Apply this checklist according to feature risk and application architecture. Record why any item is not applicable.
- Acceptance criteria pass on the release candidate.
- Applicable automated checks pass; failures and skips have explicit dispositions.
- The current diff has accountable human review.
- Authentication and server-side authorization are checked where applicable.
- Input handling, output rendering, and sensitive-data exposure are reviewed.
- Dependencies are necessary and reviewed for provenance and known security concerns.
- Configuration and secrets are appropriate for the target environment.
- Migrations, if present, have compatibility review, staging validation, and a data-recovery strategy.
- Representative staging behavior, failure feedback, and relevant performance are checked.
- Deployment, code rollback, monitoring, and smoke-test plans have owners.
- A named human approves the release and residual risks.
OWASP’s Authorization, Input Validation, and Secrets Management Cheat Sheets provide relevant security guidance. This checklist does not establish OWASP compliance.
CI/CD—continuous integration and continuous delivery or deployment—can automate checks and deployment steps. Passing a pipeline alone does not establish production readiness.
Staging provides representative evidence, not proof of identical production behavior. Database changes may require backups, forward fixes, or coordinated recovery rather than a mechanically reversible migration.
Close the loop after release
Execute the planned smoke tests: brief checks that critical behavior still works after deployment. Assign post-release monitoring to an owner for a window appropriate to traffic and risk.
Observe errors, failed requests, critical user paths, data integrity, feedback, and unexpected performance changes. Convert confirmed issues into bounded task briefs. Update permanent rules only when the learning applies beyond this release.
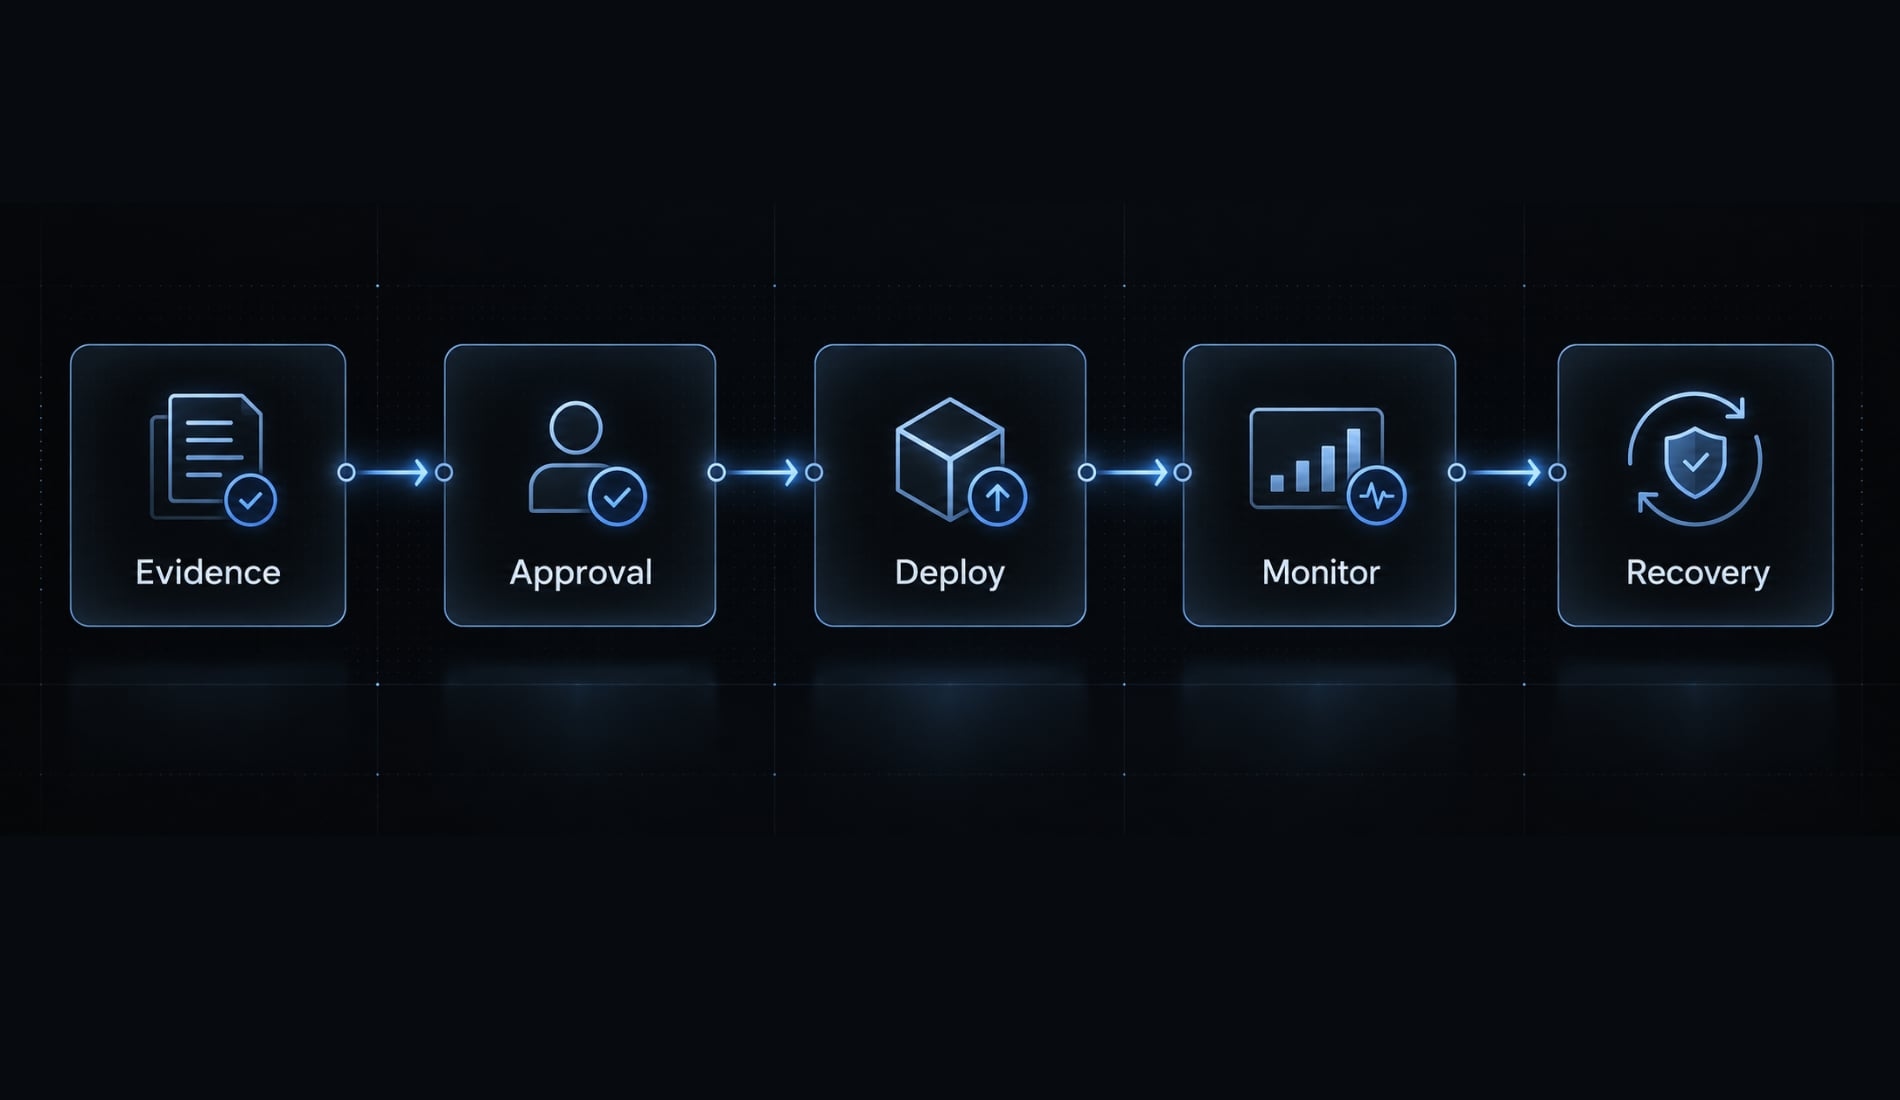
Human control, common failure modes, and the final workflow checklist
Automation does not transfer accountability. A human-in-the-loop process needs meaningful decisions, not a ceremonial approval click. High-risk changes may require specialist engineering or security review.
What the AI can do and what humans must approve
Delegation level | Boundary |
|---|---|
Lower-risk work within approved scope | Draft plans or inspect permitted files; sensitive content still requires restrictions |
Implementation requiring mandatory review | Generate code, tests, and refactoring proposals; humans evaluate evidence and changes |
Accountable human approval | Decide product behavior, sensitive access, architecture exceptions, and production release |
Delegation depends on permissions and runtime effects, not only the task’s label.
Common vibe coding mistakes
- Vague requests → Define observable behavior.
- Repository dumping → Supply relevant context.
- Context drift → Refresh the brief and handoff.
- Whole-feature generation → Isolate one end-to-end slice.
- Trusting test summaries → Inspect execution evidence.
- Endless repairs → Preserve work and restart narrowly.
- Local success treated as release approval → Apply the release gate.
Vibe coding workflow checklist
- Define the user outcome.
- Approve scope and acceptance criteria.
- Assign an accountable owner.
- Record baseline failures and preserve existing work.
- Supply relevant context without secrets.
- Restrict agent permissions independently.
- Approve the plan before edits.
- Implement one bounded vertical slice.
- Observe validation and inspect generated assertions.
- Review the diff and commit a working checkpoint.
- Update the handoff and obtain human release approval.
- Execute owned monitoring and recovery plans after release.
Use the checklist without adding unnecessary documentation. Each item should produce a decision or evidence that another maintainer can inspect.
Optional: Turn repeated steps into reusable agent skills
Once planning, review, testing, and handoff procedures work consistently, package them as reusable agent skills or workflows. AgentKit is an optional way to organize that reuse. Standardize a proven process rather than automate an undefined one; no toolkit replaces permissions, observed validation, or accountable approval.
Frequently asked questions
How does a structured workflow differ from casual prompting?
Casual prompting often relies on generating large code blocks without verification, frequently leading to inconsistent architecture and "doom loops." A structured vibe coding workflow uses explicit task boundaries, test-driven micro-loops, and human approval gates to ensure that every AI-generated change is observable, tested, and aligned with project standards.
Why is a feature brief necessary for AI-assisted development?
A feature brief prevents scope creep and hallucinations by forcing you to define the "what" and "how" before the AI writes code. By documenting user outcomes, acceptance criteria, and specific constraints, you provide the agent with a source of truth that keeps the implementation focused on testable, measurable behavior.
What are vertical slices in a vibe coding workflow?
Vertical slices are small, end-to-end increments of functionality that include everything from database schemas and server logic to UI components and feedback. Building in slices allows you to validate one complete, observable behavior at a time, making it easier to spot errors, review diffs, and maintain project stability.
What should be included in an AI instruction file (e.g., AGENTS.md)?
An effective instruction file should contain the project’s purpose, technology stack, architecture conventions, and restricted scopes. It must list specific validation commands the agent should run after edits and define rules for dependency and API usage to ensure the AI operates within safe, pre-approved boundaries.
When should I stop an AI-assisted coding task and restart?
You should stop when repeated repair prompts expand the task scope or introduce regressions. If the agent enters an unproductive loop, preserve logs of what went wrong, revert the repository to a known-good checkpoint, and restart the process with a narrower task brief and clearer constraints.
Who is responsible for the final production release?
The human engineer is always responsible for the production release. While agents can assist in drafting and testing code, human approval is mandatory to verify security, confirm that acceptance criteria are met, and ensure that the feature is ready for real-world traffic, regardless of the AI's success summaries.
Read more:
- DeepSeek vibe coding: A practical workflow and safety guide
- How to vibe code: A practical beginner guide to AI development
- Vibe coding product spec: Build faster with AI clarity
Conclusion
Keep changes small, define behavior first, and preserve working checkpoints to ensure failed experiments remain easily recoverable. A reliable workflow makes assumptions, evidence, and ownership visible before deployment without adding unnecessary ceremony.
Test the process on a single, bounded feature before team-wide adoption. Copy the brief and final checklist, then build one vertical slice through one verified commit.